LabVIEW & MATLAB
LabVIEW Overview
LabVIEW is a software development environment originally designed for computer-controlled data acquisition. It has since grown to be a general purpose programming environment with a wide range of applications.The basic object in LabVIEW is a Virtual Instrument or VI. It has two parts:
- The Front Panel or GUI
- The Block Diagram or programming guts
The VI Front Panel was originally designed to mimic the front panel of a laboratory instrument, but it can be set up to resemble pretty much any sort of user interface. National Instruments has a website entitled LabVIEW 101, that contains a series of instructional videos and PDFs of instructions. We recommend you start there. They also have an older web video to get you started with LabVIEW.
Front Panel
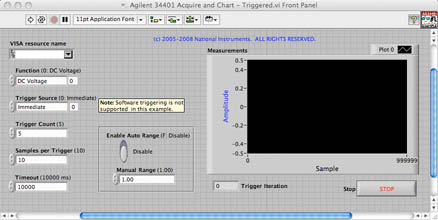
Front panels have inputs called Controls and outputs called Indicators. They also have an Icon and a Connector Pane for determining which controls and indicators will be available when the VI is used as a sub-VI.
Block Diagram
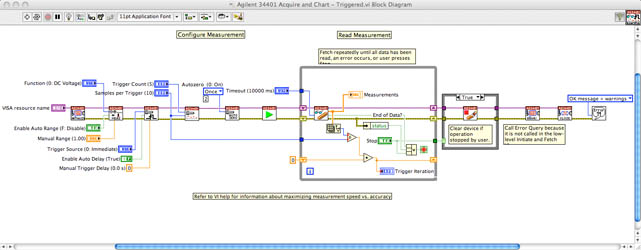
LabVIEW VIs are programmed in the object-oriented graphical programming launguage G. It is object-oriented to the extreme with inheritance, polymorphism, etc. There are thousands of objects available. One of the hardest things to do is find just the object you want, because it's probably out there somewhere.
Data Types
LabVIEW has a vast collection of data types. The scalars include:
- Extended, Double. Single-precision floating point numbers
- Fixed-point numbers
- 64-bit, 32-bit, 16-bit, 8-bit signed integers
- 64-bit, 32-bit, 16-bit, 8-bit unsigned integers
- Complex numbers
- Strings
- Booleans
- Arrays can have as many dimensions as desired and can have elements that are any of the scalar, string, or boolean data types, or any other data type including clusters, waveforms, and Dynamic Data
- Clusters
- Waveforms
- Dynamic Data
These are the most common types.
Structures
Structures are used for program control such as looping. The standard loop structures are available:
For those who are tired of dragging icons and wires around, the Formula Node, the MathScript Node, and the MATLAB Node will permit you to write code in a more traditional manner and interface it with LabVIEW. The Formula Node uses a "c"-like syntax. The MathScript Node and MATLAB Node use the syntax found in MATLAB ".m" files. The difference is that the MathScript node executes the code using LabVIEW's built-in interpreter and will work on any platform that runs LabVIEW. It doesn't have quite as extensive library of functions as MATLAB. The MATLAB node only works on Windows and requires a copy of MATLAB to be running on the same machine. This node sends the m-code to MATLAB for execution and then reads the results back in to LabVIEW. The most common mistake in using these nodes is forgetting to set the data type (e.g., 1-D array) of the input and output variables.
Sub-VIs
Any existing VI can be used as a sub-VI on the block diagram of another VI. To make the sub-VIs as useful as possible, it's important to use the connector pane to assign the desired controls and indicators to the connectors on the icon. It's also useful to edit the icon so that the sub-VI is easily recognized on the block diagram.
Some Keyboard Shortcuts
A complete list of pre-existing keyboard shortcuts is available here. Some of the most useful ones are:
- Ctrl-E – Switch between Front Panel and Block Diagram
- Ctrl-B – Remove bad wires
- Ctrl-U – Reroute all existing wires and rearrange objects on the block diagram automatically
- Ctrl-R – Run the VI
- Ctrl-. – Abort a running VI
Shift Registers and Enable/Disable Indexing
Iterative calculations involving for loops or while loops often require knowledge of the previous value of a variable in the present execution of a loop. A Shift Register provides a mechanism for supplying previous values. You add shift registers by right-clicking on the edge of a while or for loop.
Sometimes when operating on an array in a loop you want to operate on the array elements one-by-one. Other times you want to operate on all of the elements at once. You can change the state from one-by-one to all-at-once and back by right-clicking on the boudary of the loop and choosing Disable Indexing or Enable Indexing. For loops have Enable Indexing set by default and while loops have Disable Indexing set by default. If you attach an array to a for loop the loop will execute for exactly the number of elements in the array.