Altimeter and Thermistor Calibration
Objective
By the end of the laboratory the student will:
- Determine the calibration constants for a pressure sensor from empirical data.
- Determine the Steinhart-Hart constants for a thermocouple from empirical data.
- Develop a relationship to convert from pressure to altitude and vice versa with a standard atmosphere.
- Develop the software to analyze the pressure and temperature sensor data from an actual flight to calculate temperature versus altitude for the flight.
Section 1 – The Standard Atmosphere
The instructions for this lab are not as detailed as for some of the earlier labs. You are expected to plan out your experiments and fill in the blanks. Ask a proctor or professor for help if you can't figure out what to do.
Develop VIs or Matlab scripts to convert from absolute pressure to altitude and from altitude to absolute pressure. Determine the normal pressure variations due to highs and lows in the barometric pressue as reported by weather stations and calculate how much effect the variation has on the altitude reported by a pressure altimeter. Measure the room air pressure with the reference pressure transducer (using the provided software) and compare the calculated altitude of the lab with that on a topographic map or other independent reference. If possible, correct for the barometric pressure.
Section 2 – Pressure Transducers
There are two altimeter pressure transducers aboard the rocket. The R-DAS has an MPXH6115A sensor on board, and the IMU has an MPXA4115A sensor on board. Both of them need to be calibrated. The R-DAS manual and the first Tech Tip explain how to set the calibration on the R-DAS. You need to calibrate both transducers to an altitude of at least 10,500 feet. You may use the pressure chamber (it's actually a dessication chamber) and the hand vacuum pump. The reference pressure sensor has an accuracy of 0.02%. Please indicate what uncertainty in altitude a 0.02% error corresponds to in Claremont and at 10,500 feet. Please develop and test whatever VIs or Matlab scripts you will need to interpret the pressure readings as altitude for the rocket flights. Please do not use the laptop connected to the Mensor sensor for any purpose other than reading the Mensor sensor.
Please explain your calibration strategy, protocol, and data analysis plan to a proctor or a professor before beginning calibration. Have the professor or proctor sign your lab notebook (notebook use ended in 2012) to indicate this explanation has been completed.
Both the Rdas program and the RDASTelemRead.vi may prove useful. The R-DAS raw data format is the raw integer from the analog-to-digital converter. To convert from the raw value to a voltage, divide by the range of the 10-bit converter ( 210 = 1024) and multiply by the voltage span (5 V). For many analyses, the conversion isn't necessary.
Section 3 – Thermistors
The rockets have four thermistors on board. The small ones are Analog Technologies P/N ATH10KR8. The large ones are Murata P/N NTSD1XH103FPB50. They all have a nominal resistance of 10 kΩ. They follow the three-term Steinhart-Hart equation. The two different models have slightly different constants. The thermistor-measurement circuit is a precision 5V reference connected to a voltage divider consisting of a precision 10 kΩ resistor followed by the thermistor which is grounded. The R-DAS measures the voltage across the thermistor. If no thermistor is present the R-DAS reads +5V. Please do not disconnect the thermistors. If you have questions, ask a proctor or a professor.
The Thermotron Environmental Test Chamber is found in the Wind Tunnel room. It permits you to adjust the temperature to which the rocket is exposed. You are to plan out your temperature calibration scheme. The Thermotron is available for you to use. Please do not go below -25°C or above +50°C. You are to develop and test whatever VIs or Matlab scripts you will need to interpret the temperature readings for the rocket flights. Both the Rdas program and the RDASTelemRead.vi may prove useful starting points.
To get you started with the Thermotron, the basic operationg instructions are:
- Switch on Thermotron Touch Screen (Press the large button).
- Touch "Manual" on screen side bar.
- Make sure refrigeration "cascade" mode is on.
- Touch Set Point and Enter Desired Temperature.
- Touch "Run".
- Wait for Steady State (typically 5-10 minutes. observe temperature graph on screen).
- Repeat Steps 4 through 6 as needed.
- Touch "Stop" when finished
The air temperature is the temperature of the air as it comes out of the heating and cooling elements. The load temperature is the temperature of the temperature sensor at the end of the long wire. The temperature sensor should be placed close to the thermistors you are calibrating.
The refrigerant motor is noisy. Please use ear protection. If the chamber is below 0°C, raise the temperature to at least 0°C before loading/unloading the chamber with your rocket. The main danger is condensation on the electronics.
Objects do not heat or cool instantly. Make sure that the chamber temperature and the thermistor outputs have stabilized before recording calibration points. A possible way to (Finish this).
The R-DAS to IMU connections
Check with your Proctor or Professor for the latest instructions on how to assure the thermistors, pressure sensor, and R-DAS are connected. We will update the website as quickly as we know the connections ourselves.
The instructions from 2008 follow: There are 12 sensor outputs on the IMU. THe R-DAS can only read 6 of them at a time. There are two different connectors on the R-DAS-to-IMU cable. One reads the three rate gyros, the x- and y-axis accelerometers and the Pitot tube sensor. The other reads the z-axis accelerometer, the altimeter, and the thermistors. The channels are as follows:
IMU to R-DAS Connections
| R-DAS Channel |
Connector 1 |
Connector 2 |
| ADC0 |
Accel X |
Thermistor 1 |
| ADC1 |
Accel Y |
Thermistor 2 |
| ADC2 |
Pitot Pressure |
Thermistor 3 |
| ADC3 |
Omega X |
Thermistor 4 |
| ADC4 |
Omega Y |
IMU Accel Z |
| ADC5 |
Omega Z |
IMU Altitude Pressure |
| ADC6 |
R-DAS Accel Z |
R-DAS Accel Z |
| ADC7 |
R-DAS Altitude Pressure |
R-DAS Altitude Pressure |
You should use Connector 2 for all of your calibrations in this lab, and you should not need to change it.
Using the Reference Pressure Sensor
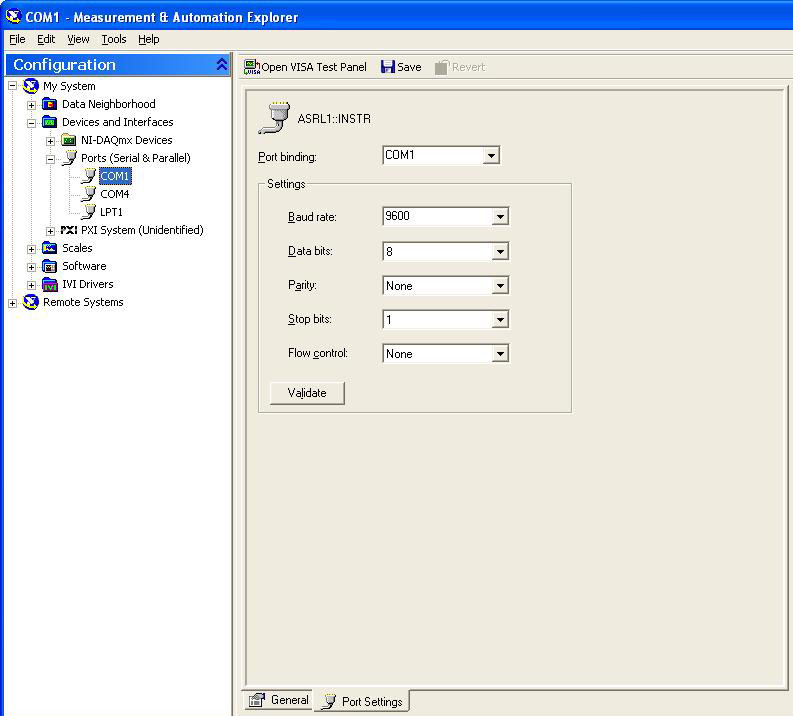
The reference pressure sensor is a Mensor Series 6000 digital pressure transducer. For reasons known only to the demigods of Windows, the sensor refuses to communicate with LabVIEW (before you think you can fix it, remember that I've been using LabVIEW since 1985). Therefore, the following method is the only reliable one presently known for reading the sensor. Please do not use the laptop connected to the sensor for any purpose other than reading the Mensor sensor.
- Start the laptop by the pressure system if it's not already on.
- Start Measurement & Automation either through the Start menu or by double-clicking the icon on the desktop.
- Open Devices & Interfaces, and then Ports, and click on COM1. If necessary, click on the Port Settings tab. If the Baud rate is set to ANYTHING other than 9600, switch it to 9600, save and quit, then start over at Step 2.
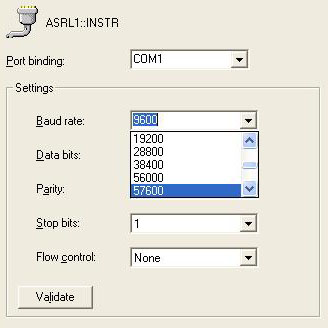
- Switch the baud rate to 57600. DO NOT SAVE!
- Open the VISA Test Panel and click on the Write tab. Clear the contents and enter #1?\r.
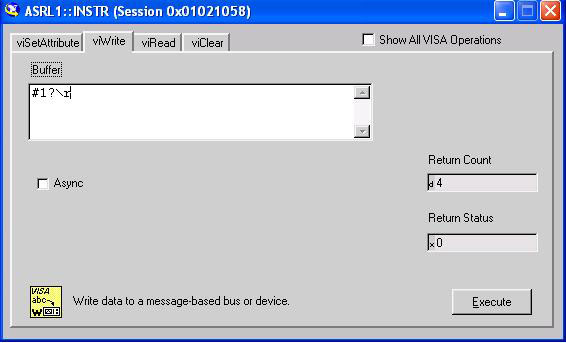
- Click on Execute, and then the Read tab, and then on Execute.
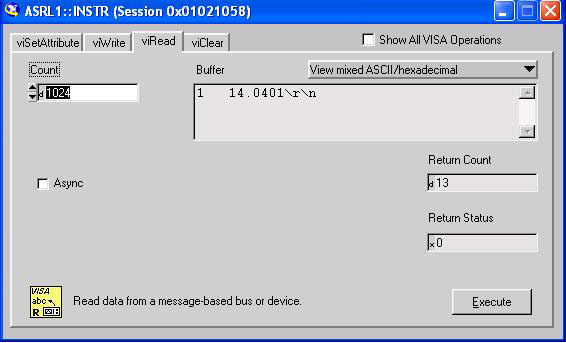
In the above example the pressure is 14.0401 psia.
- To read another pressure, click on the write tab, click on Execute, click on the Read tab, and click Execute.
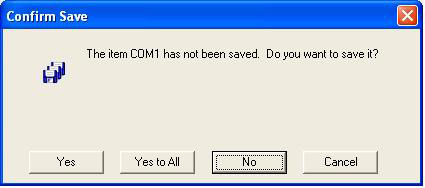
- When you are totally finished with all of your pressure measurements, exit from the Measurement & Automation Explorer. A dialog box will come up asking if you want to save the changes to the serial port. UNDER NO CIRCUMSTANCES are you to click Yes. Simply click No and exit. You may shut down the laptop and unplug the pressure sensor if you desire.