**E178: Lab 3 Fillet Construction**
|[home](../index.md.html)|[syllabus](../syllabus.md.html)|[assignments](../assignments.md.html)|[labs](../labs.md.html)|[final project](../finalproject.md.html)|[flight data](../FlightData.md.html)|[getting certified](../RocketryCertification.md.html)|
# Purpose of the Lab – Why Fillets
Fillets are used in several locations during rocket construction. The primary purpose for
them is to [increase strength and decrease stress concentration][fil].
A secondary function is to
reduce aerodynamic drag and for cosmetics. When building a rocket with through-the-wall
fins, fillets are added both on the interior and on the exterior. When building a
minimum-diameter rocket, there is no way to attach the fins to the inside, so the external
fillets provide most of the strength for holding the fins onto the rocket. It's important
to fillet the fins correctly. There are many on-line resources available showing how to
do the fillets. There is a list below.
Some more details of the supplies for this lab is on the
[Flight Hardware](../FlightHardware.md.html) page.
# Safety
When working with fiberglass and epoxy:
* Always use a lab coat (if available), nitrile gloves, and safety glasses when using
epoxy. Repeated contact of epoxy with skin leads to very serious allergic reactions.
* On the academic side of campus, all adhesives (except white or carpenter's glue)
need to be used in a fume hood, a spray-paint booth, or outdoors away
from any air inlets to buildings.
* At home ensure adequate ventilation when using epoxy.
* Glass microspheres are an inhalation hazard. Use extreme caution and use a face mask
if possible.
* Milled glass fibers are both a skin irritant and a inhalation hazard. Use safety
glasses, nitrile gloves and a face mask when handling.
* Fiberglass must always be wet sanded: Wear nitrile gloves and frequently dip the
sandpaper in water as you sand. Airborne fiberglass particles are both a skin irritant
and a inhalation hazard. Wet sanding should keep the fiberglass particles from becoming
airborne.
# Steps in Attaching and Filleting External Fins
Always wipe down joints with acetone (plain fingernail polish remover) or isopropyl alcohol
after sanding and allow to _fully_ dry. Acetone or isopropyl alcohol will weaken epoxy if
mixed in with it.
1. Create a jig or fin guide (or use the supplied one) to hold the fin in position while the epoxy dries.
2. Dry-fit the fin and mark the location of the fin clearly.
3. Rough the edge of the fin and the body tube where the fin will attach with 80-to-120-grit
sandpaper.
4. Put a thin bead of epoxy on the base of the fin, put it in place, and push down until
some, but not all of the epoxy has squeezed out from beneath the fin. If you have pure
fiberglass-to-fiberglass contact,the joint will not be as strong as if there is a thin
layer of epoxy between them. You can actually do this step with CA instead, but it
has a greater chance of failing during the next steps
5. Put the fin guide around the fin(s) to hold it normal to the body tube. Watch out that
you don't get adhesive on the fin guide, as it can be very difficult to remove.
6. Wait for the epoxy to cure.
7. Remove the fin guide or jig.
8. Choose a tool to shape the fillet. Common choices are a length of PVC pipe, a wood dowel,
a teflon or Delrin rod, or a plastic spoon.
9. Find some way to mark where the fillet tool contacts both the fin and the body tube.
Common methods are a Sharpie, carbon paper, or a pencil or graphite. Mark the lines
where the tool contacts the surfaces.
10. Mark off the surface beyond the lines with blue tape.
11. Rough up the surface between the marks with 80-to-120-grit sandpaper. Since you need
to wet-sand fiberglass, you may need to remove the wet blue tape, dry the surfaces, and
apply fresh blue tape once you finish roughing up the surface.
12. Mix the epoxy (and filler) and apply to the fillet area. Try to keep the amount to
just a little more than you need to fill the fillet. Try to remove any bubbles with
a toothpick or similar tool.
13. Wait until the epoxy has set enough to largely hold its shape and not run, but is not
fully cured. Smooth the fillet using the fillet tool. With 5 minute epoxy (not recommended
for external fins due to strength issues), do this step
immediately.
14. Wait until the epoxy has set a bit more and pull off the blue tape diagonally away
from the fillet. It's usually better to pull too early rather than too late. Use a
paper towel dipped in acetone or isopropyl alcohol to clean up imperfections.
15. Wait until the epoxy has cured sufficiently that there's no danger of running and
heat treat it at 60°C (140°F) for 3 hours before proceeding to the next fillet. At
home, shining an incandescent light an inch or so from the surface, or placing the
part on the dashboard of a car in direct sunlight will provide sufficient heating.
16. If necessary for a smooth finish, sand the fillets or add a finishing coat of epoxy.
## Epoxy-Only Fillets
Epoxy-only fillets are challenging because the epoxy has a tendency to run, and letting
it cure sufficiently without over-curing before shaping is tricky. It is stronger but
denser than epoxy with hollow glass spheres. In bulk, it is not as strong as chopped-fiber
reinforced epoxy, but easier to work with. You are expected to attach a fin to a
fiberglass plate with one set of epoxy-only fillets.
## Hollow-Glass-Sphere-Filled Epoxy
You can experiment with adding hollow glass spheres to mixed epoxy. I usually do about
a 2-to-1 to 1-to-1 epoxy/sphere ratio by volume. The mixture should have a consistency
close to peanut butter. It is much less dense than pure epoxy and is ready for shaping
as soon as it is mixed. The hollow glass spheres have a minor negative effect on strength,
but the ease of working almost always makes it superior to pure epoxy. You are expected
to attach a fin to a fiberglass plate with one set of hollow-sphere-filled epoxy fillets.
## Chopped-Fiber-Reinforced Epoxy
Adding chopped or milled fibers (usually glass, but can be carbon fiber or kevlar) greatly increases
the strength of the fiber-epoxy composite over the pure epoxy, However, the fibers may
interfere with getting a good bond to the existing fiberglass parts in a fillet. You can add
similar ratios of fibers to epoxy as with the glass spheres.
The density is pretty close to that for pure epoxy. However, it really needs to be mixed
thoroughly and it's much harder to get air bubbles out. It's very hard to shape or pull
into shape. The best method is to press a cylinder of teflon or delrin (possibly acetone dipped)
against the fillet and work it down to the taped lines. Some people use parchment paper
between the cylinder and the epoxy. You are expected to attach a fin to a fiberglass plate
with one set of chopped-fiber-reinforced epoxy fillets.
# Steps in Attaching and Filleting Through-The-Wall Fins
1. Roughen (sand) the motor mount tube, the inside of the airframe, and the fin tang and
base where the interior fillets will be _before_ epoxying in the motor mount.
2. Wipe down joints with acetone or isopropyl alcohol after sanding and allow to
_fully_ dry. Acetone or isopropyl alcohol will weaken epoxy if mixed in with it.
3. See Steps 3 & 4 in the [Phobos assembly instructions][pho] for additional hints and
steps for through-the-wall fins and internal fillets. _Don't forget to use a fin guide
or fin jig_ instead of just eyeballing like the Phobos instruction recommend.
4. Follow steps 8 through 16 in [Steps in Attaching and Filleting External Fins](#StepsinAttachingandFilletingExternalFins)
above for how to prep the external fillets.
# Deliverables
Your deliverables are:
1. A fiberglass fin on fiberglass plate filleted with plain epoxy.
2. A fiberglass fin on fiberglass plate filleted with hollow-glass-sphere-filled epoxy.
3. A fiberglass fin on fiberglass plate filleted with chopped-glass-fiber-reinforced epoxy.
You must bring them to the classroom/lab on the due date to be visually inspected, and to
the MTS lab on the testing day to be tensile tested.
# Grading
The grading will be:
25% on aesthetics: how smooth, bubble free, uniform, and properly
shaped the fillets are.
75% on strength from the tensile test.
# Resources
- [How to Fillet Fins](http://www.skypirate.net/rocketry/con_fil_01.htm)
- [Blackhawk 38 instructions](../PDF/BlackHawk38_Ins.pdf)
- [Another example](http://www.rocketryforum.com/showthread.php?45666-CJ-s-quot-HOW-TO-BUILD-IT-STOCK-3IN-DARKSTAR-into-quot-redux-quot-build-starts-now!!&p=447476#post447476)
# Results
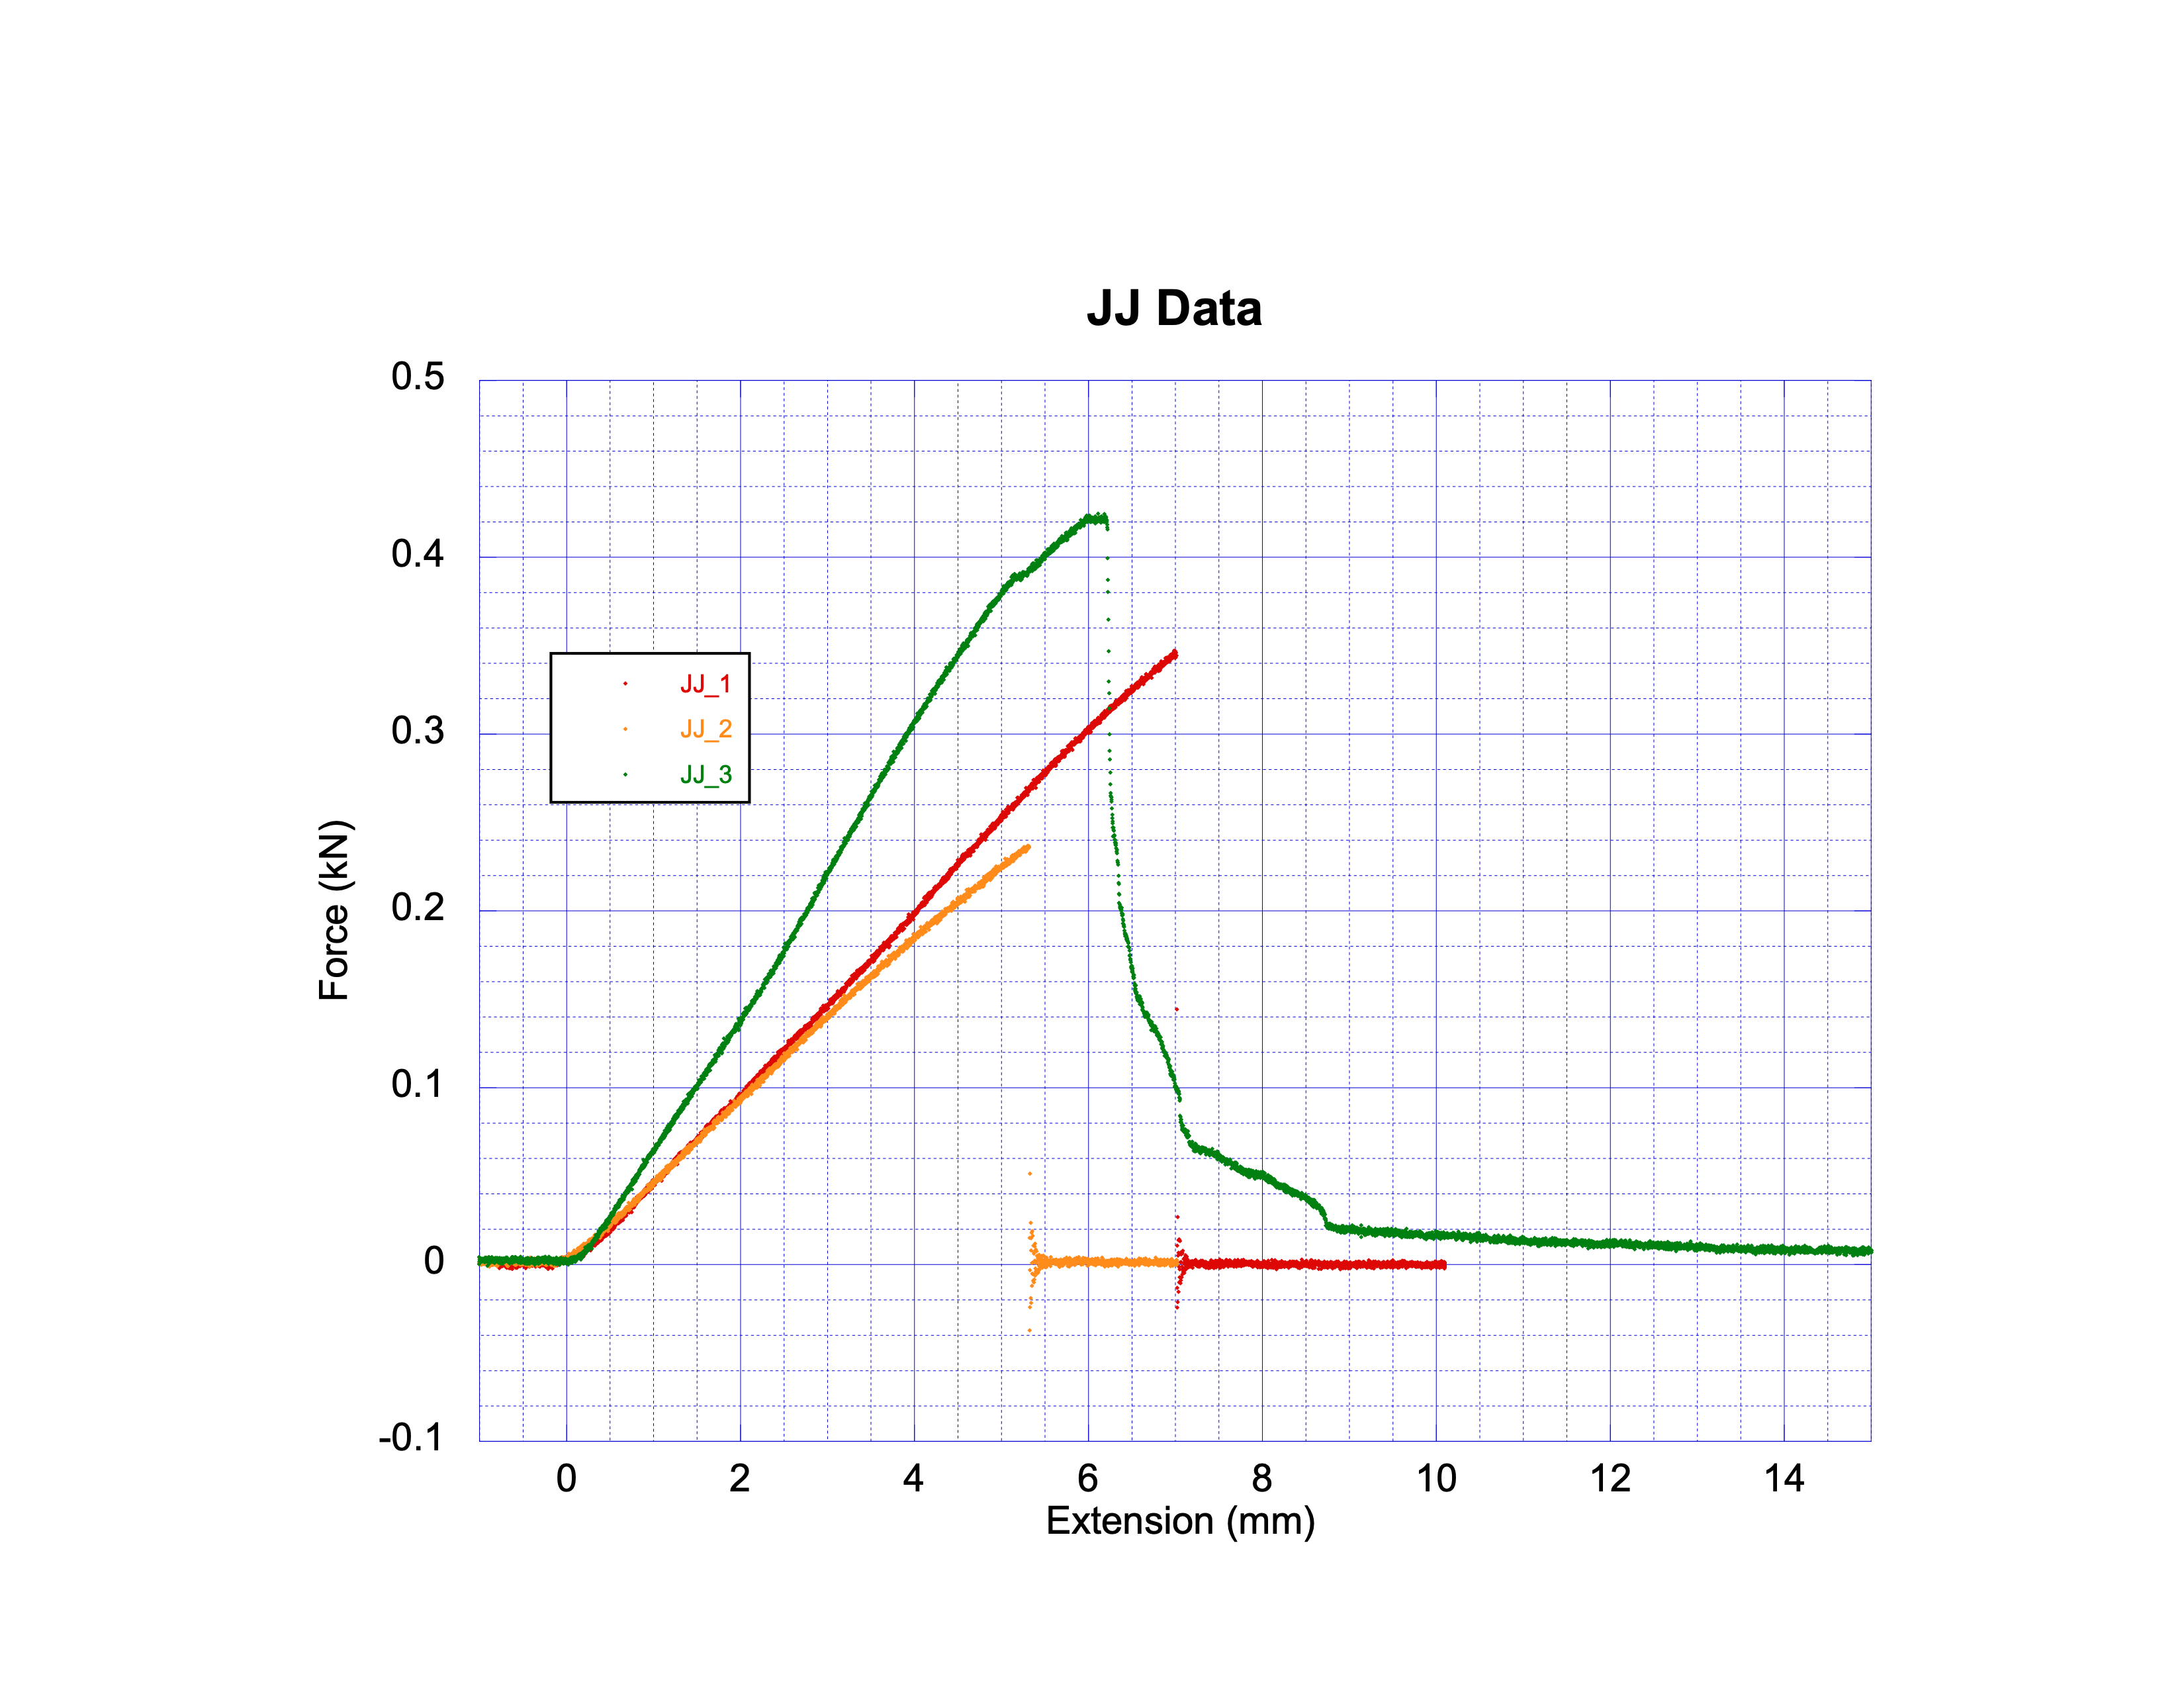
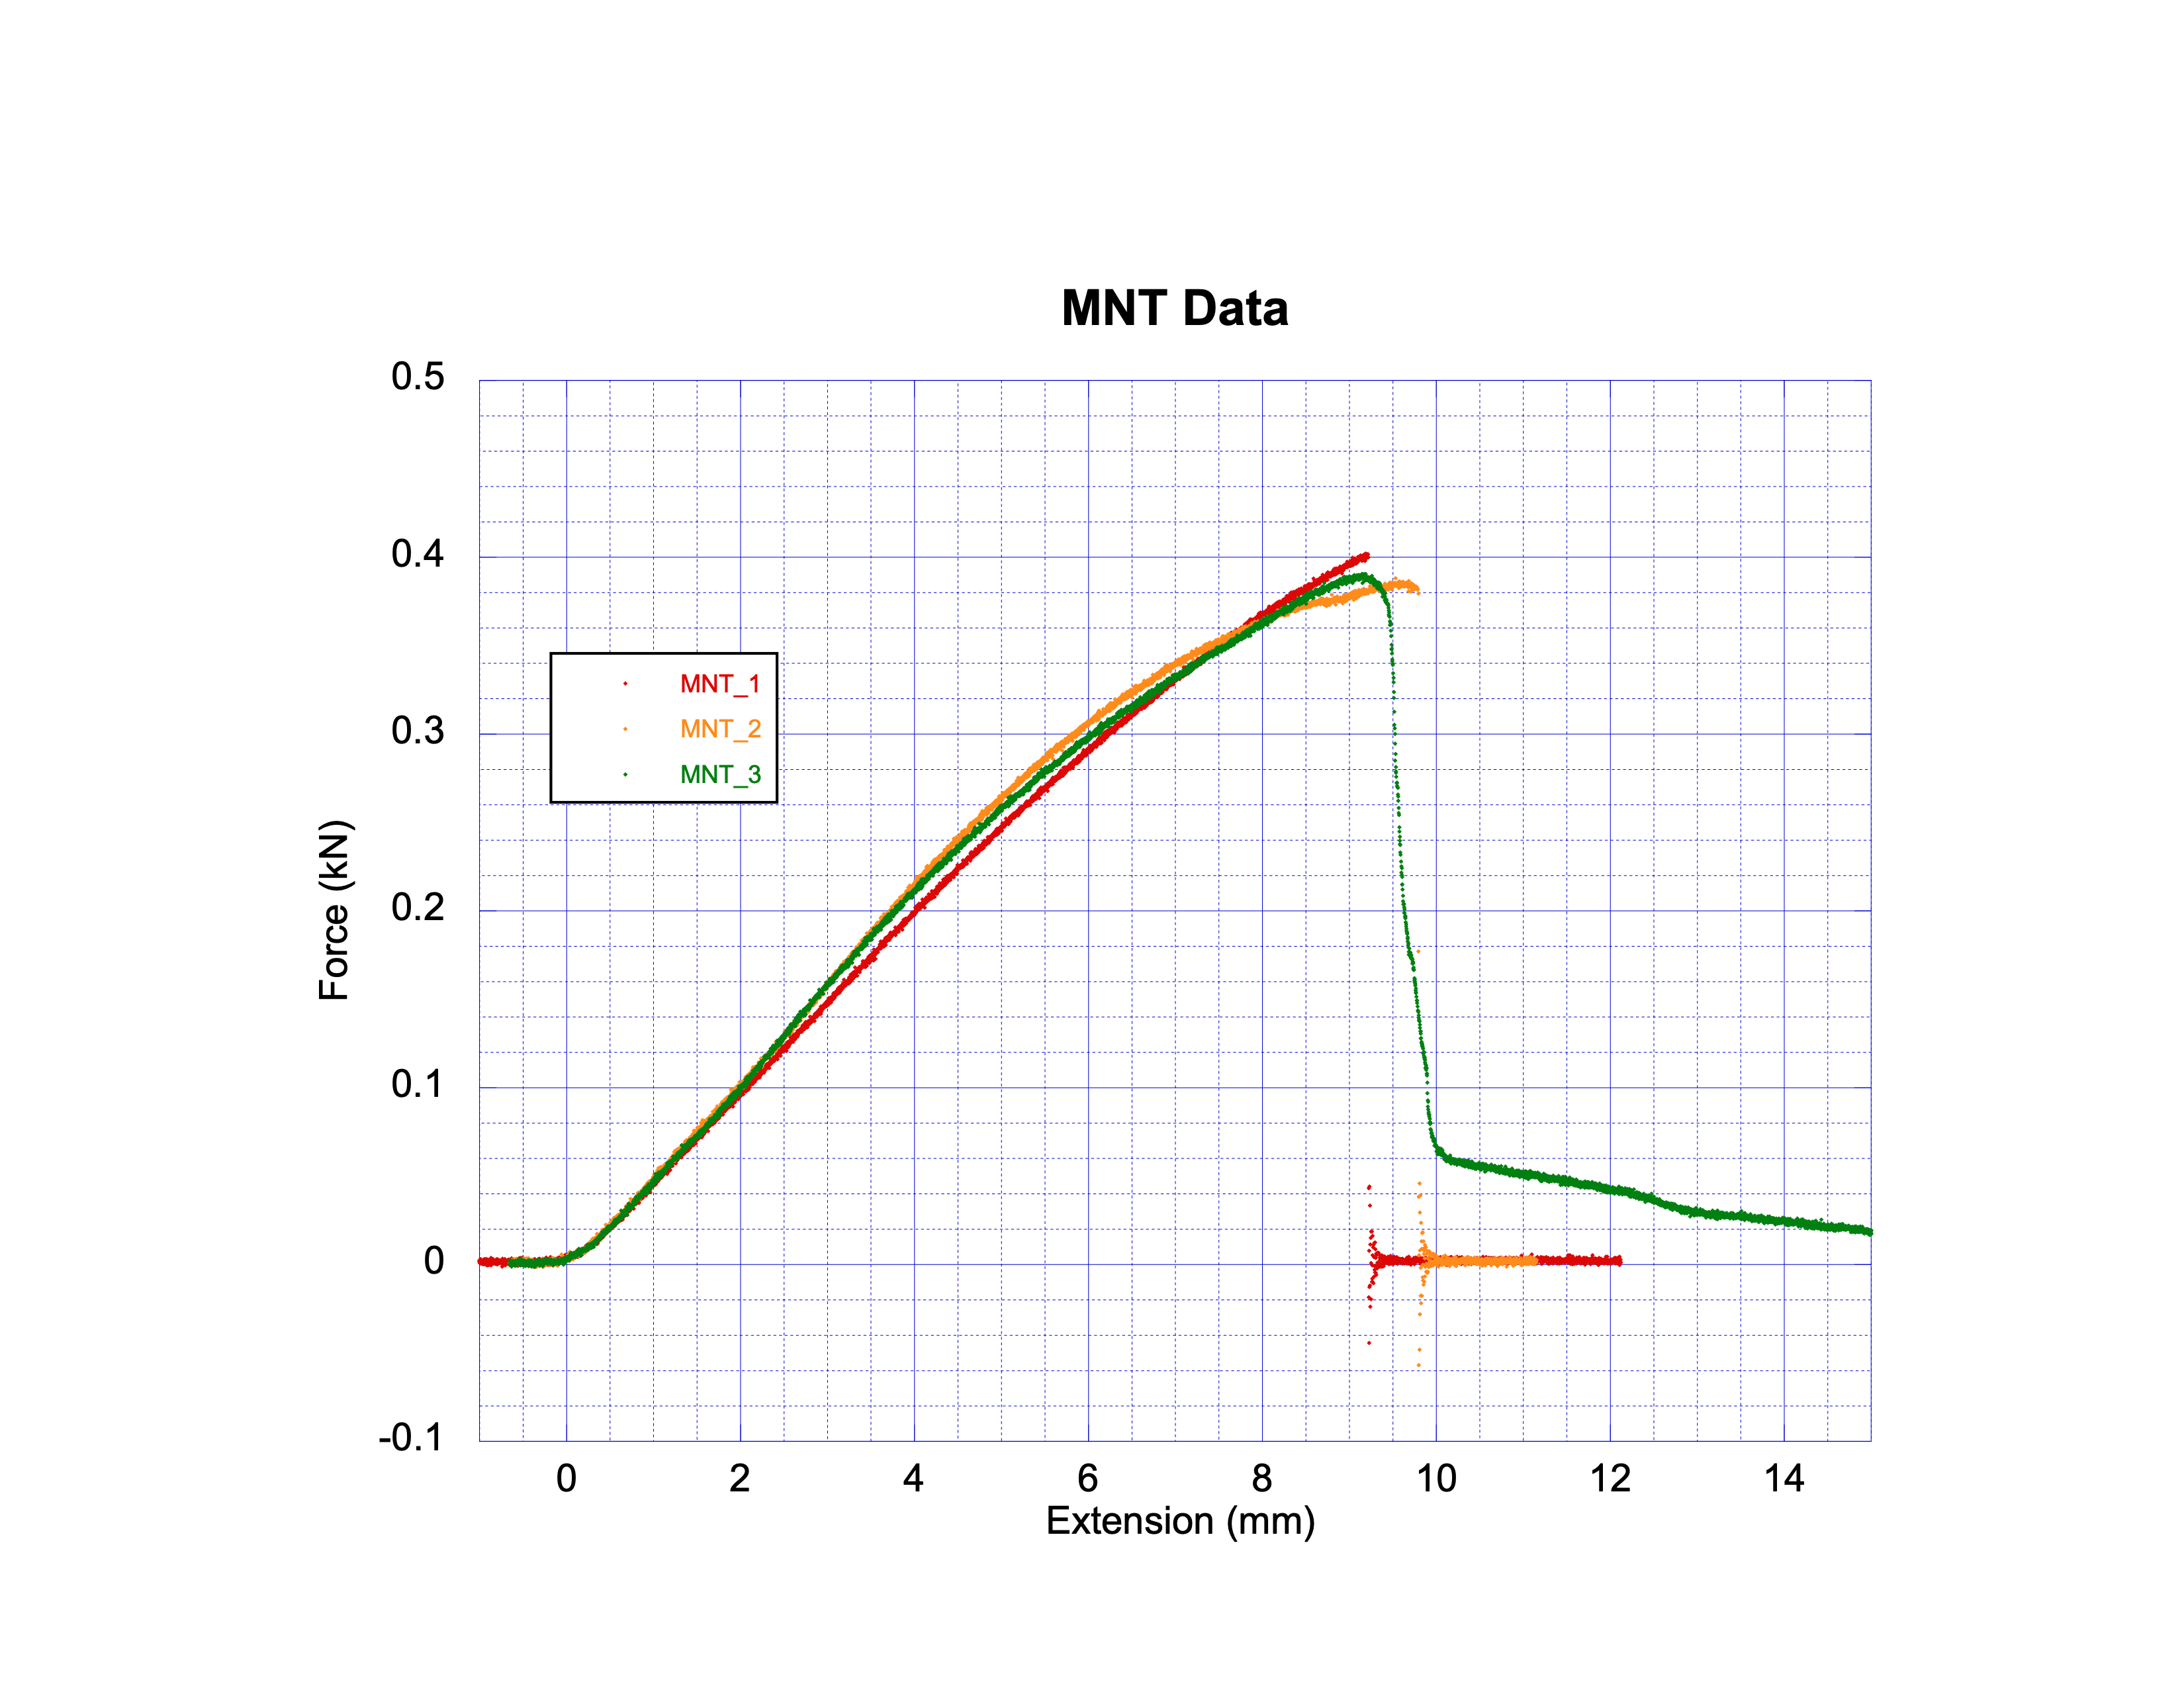
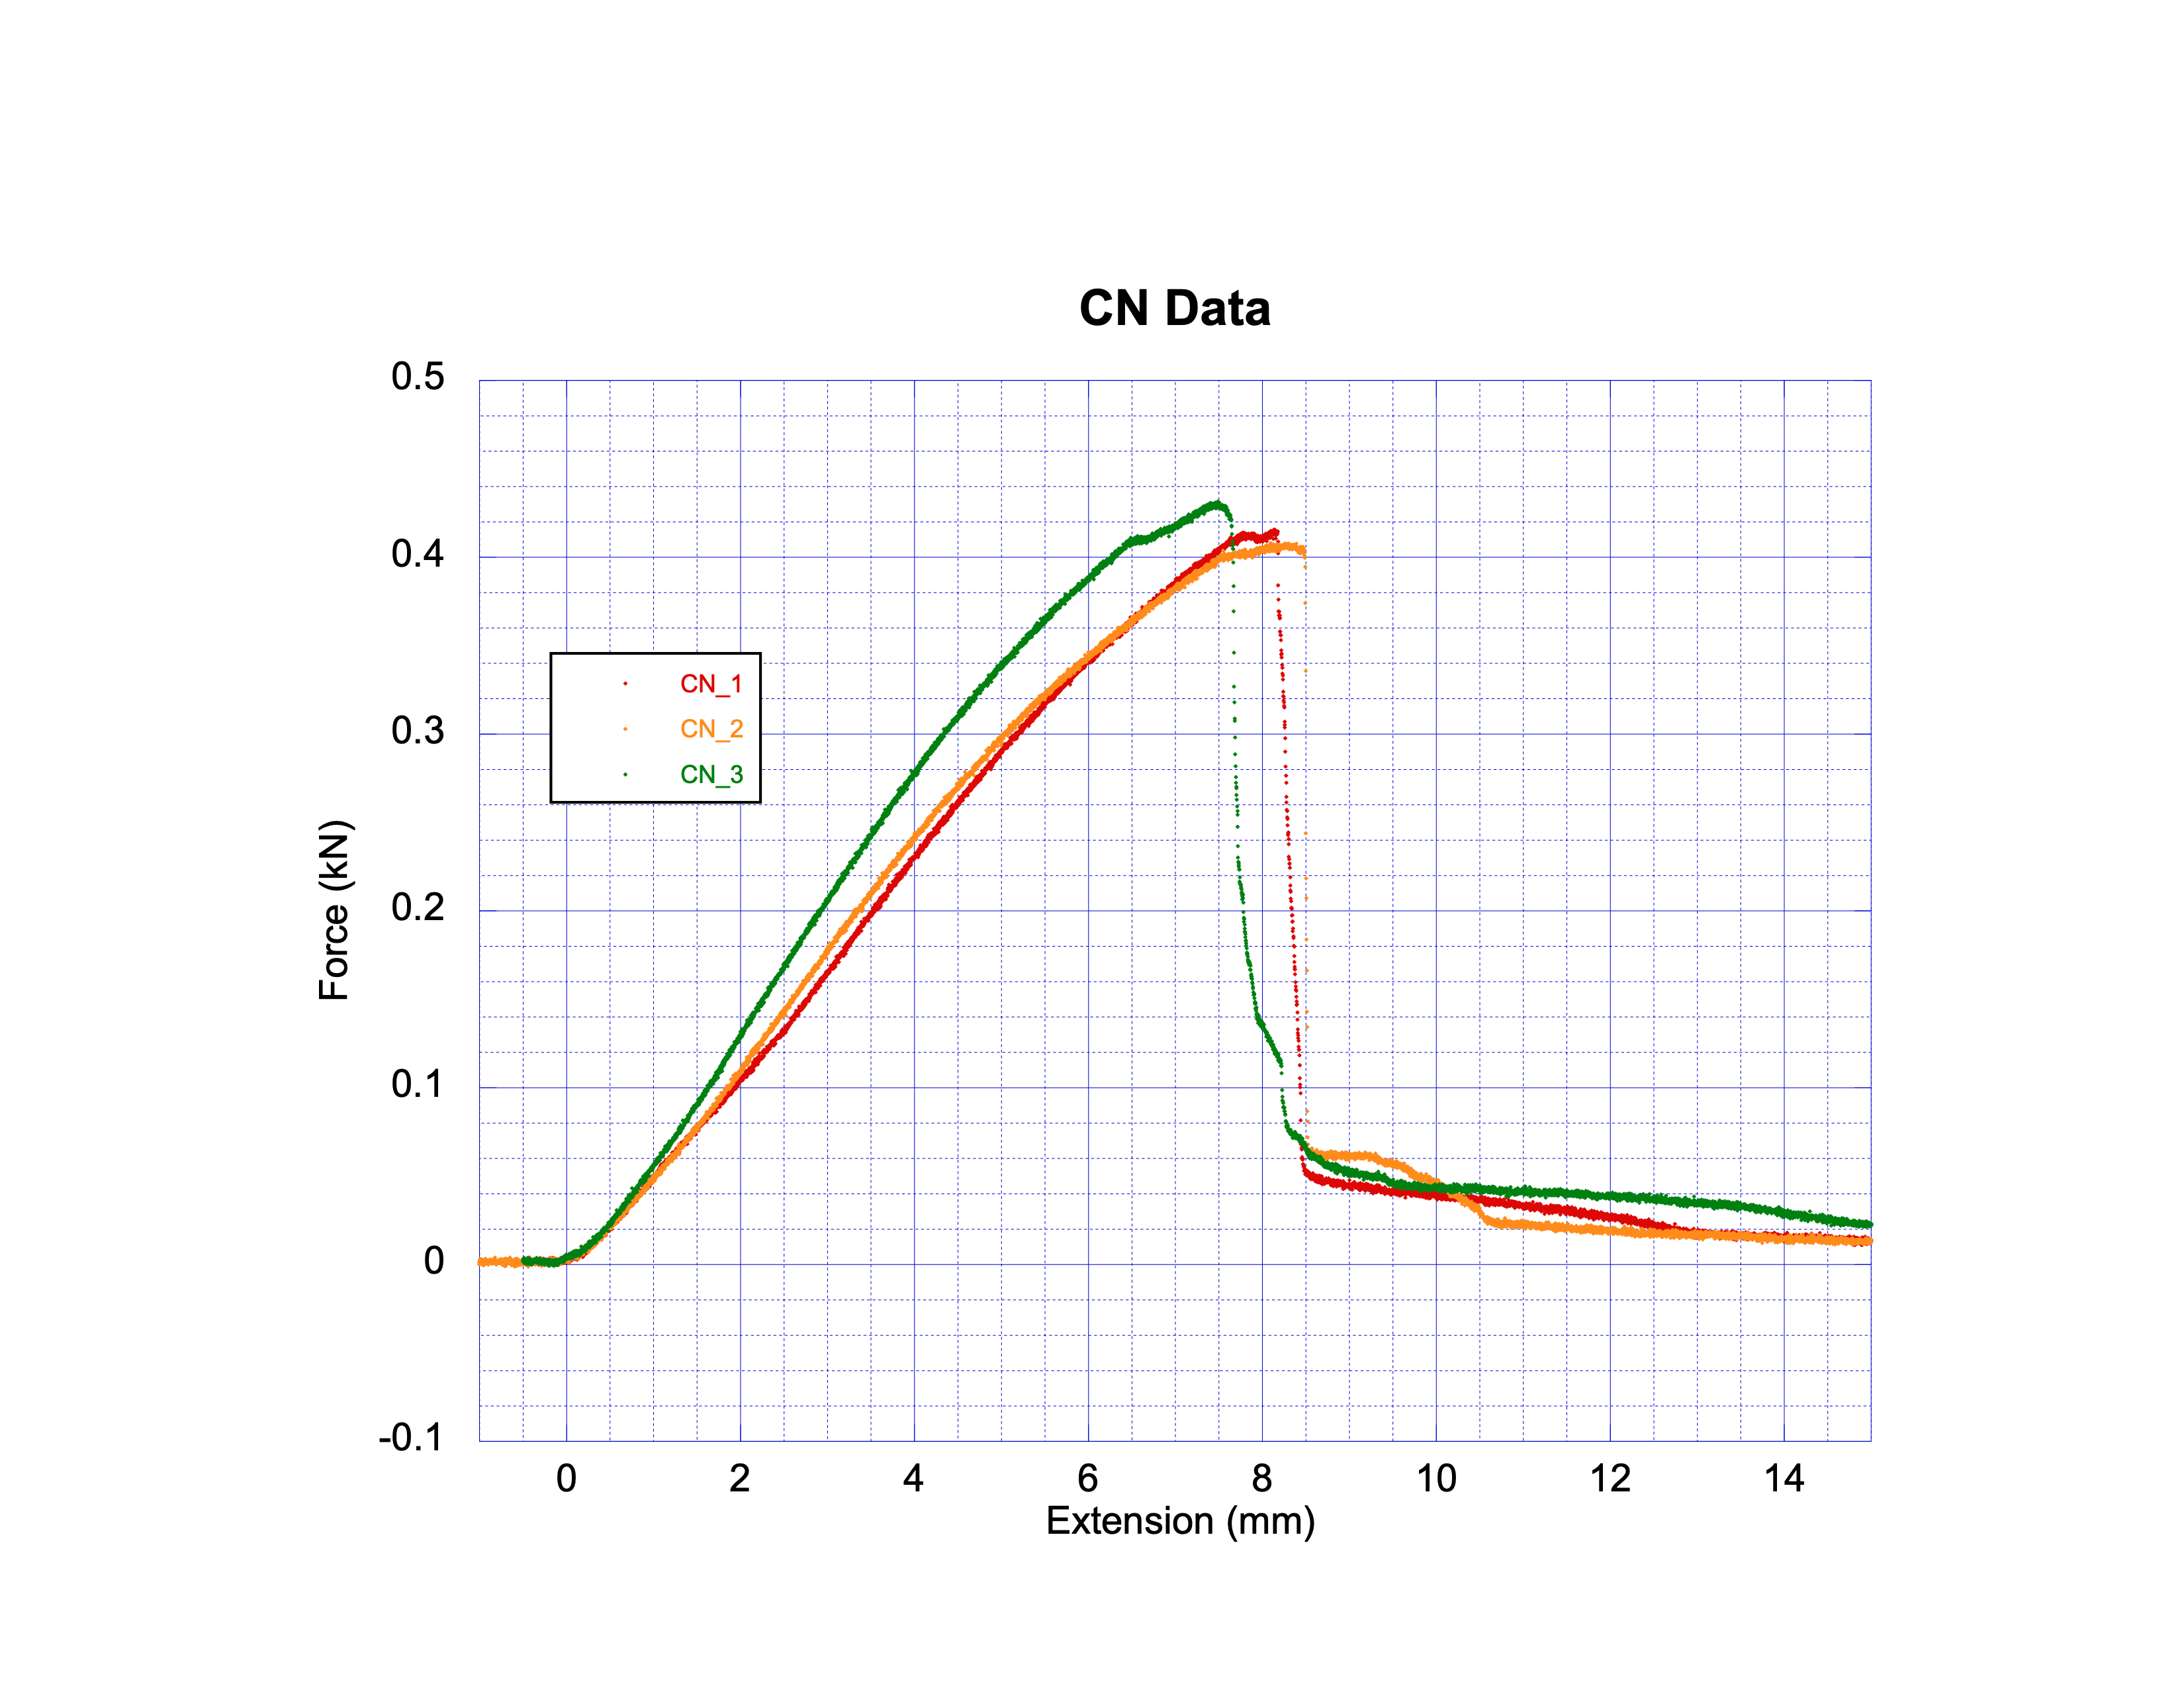
## The Results of 2024's Lab 3 are found here.
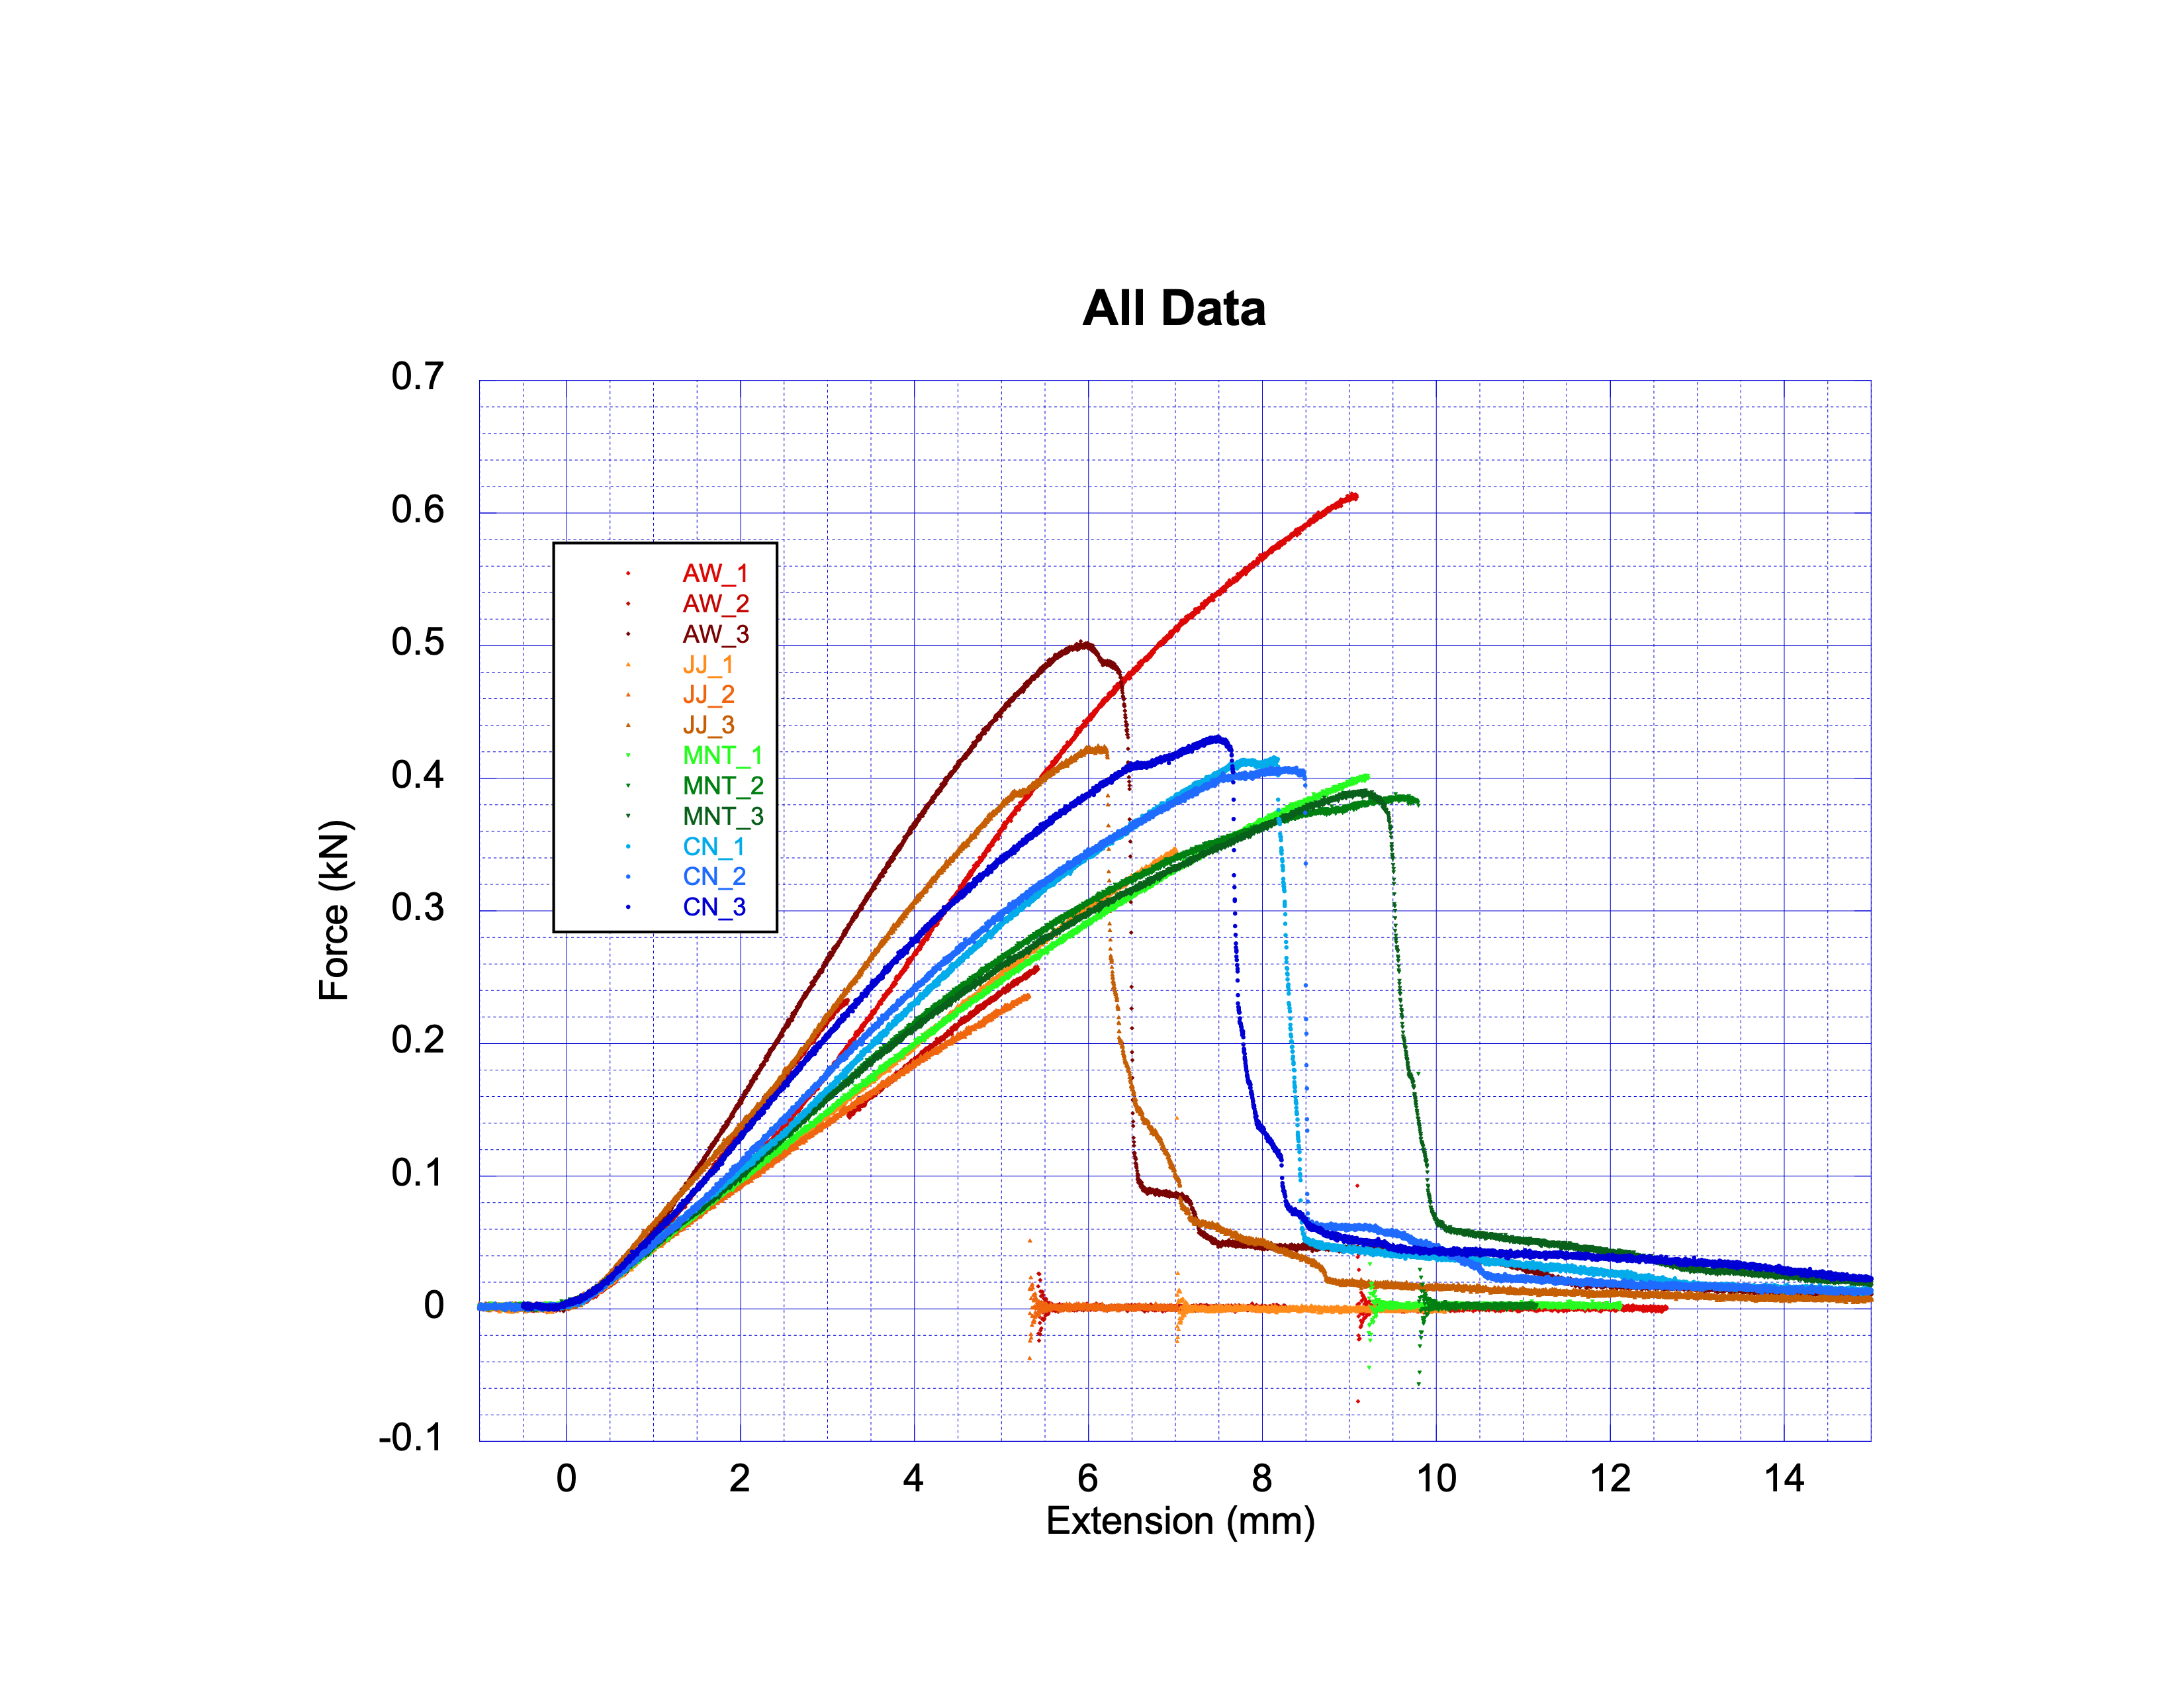
### Plotted by Composition
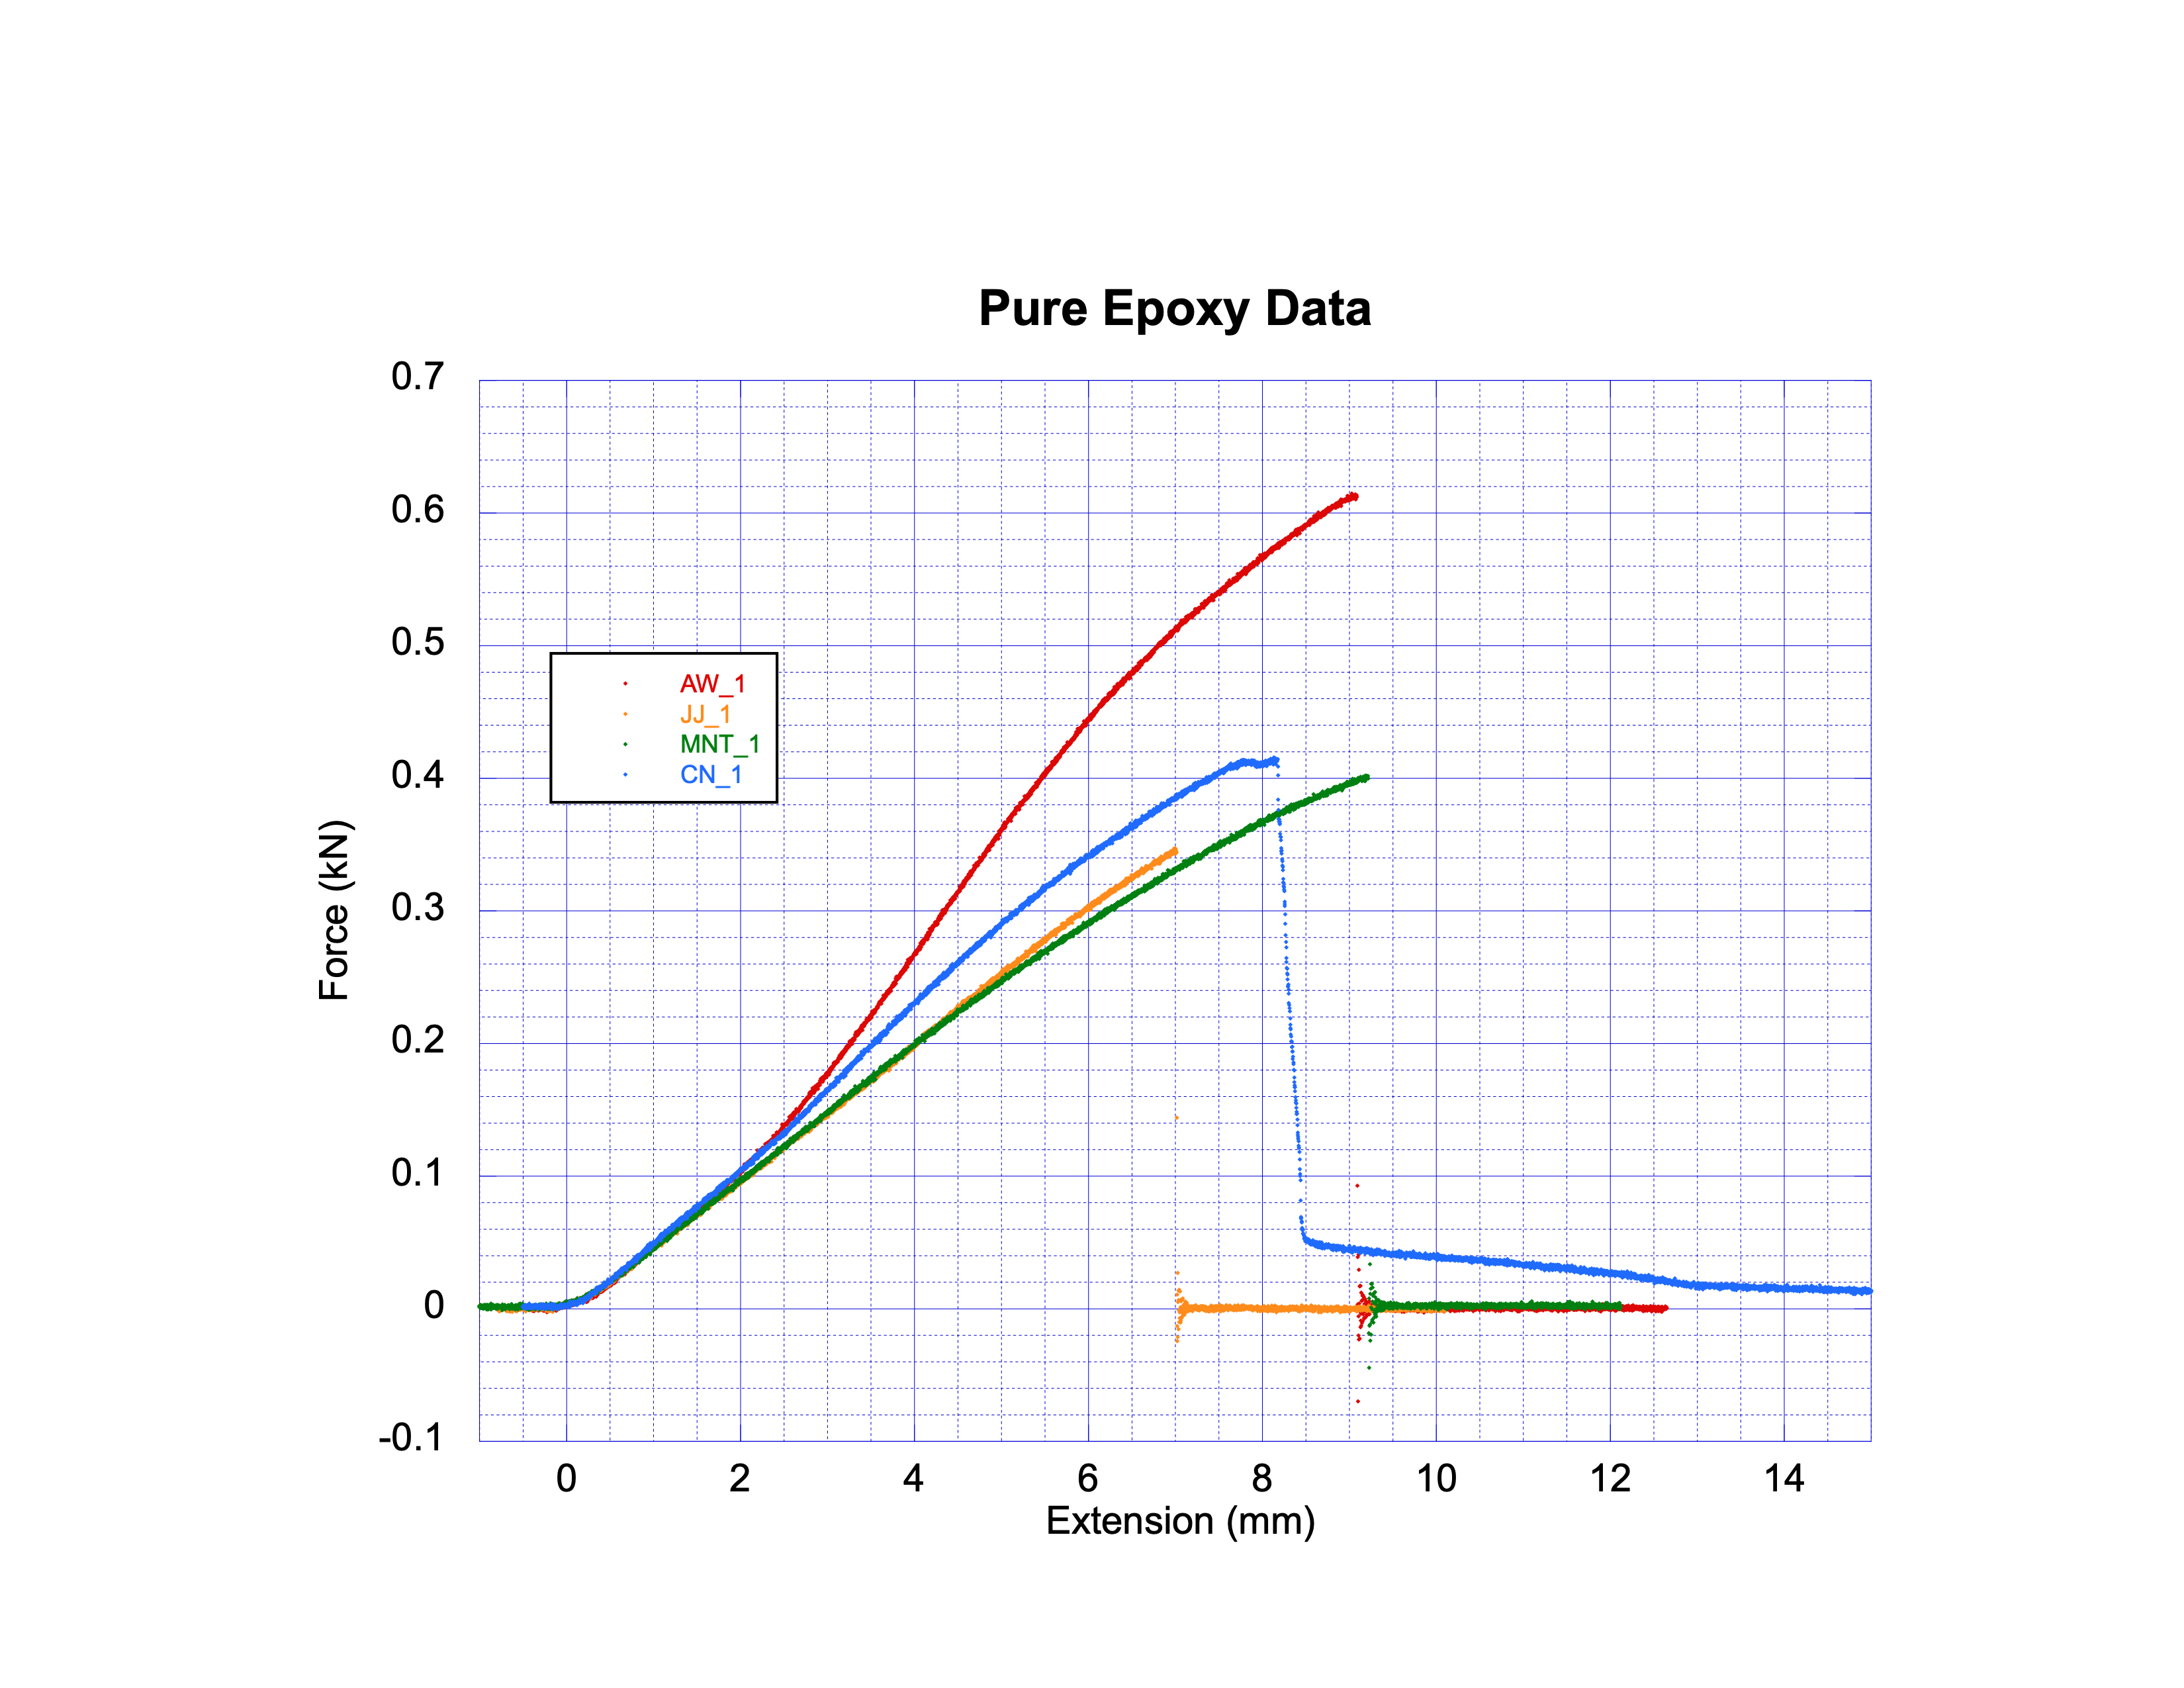 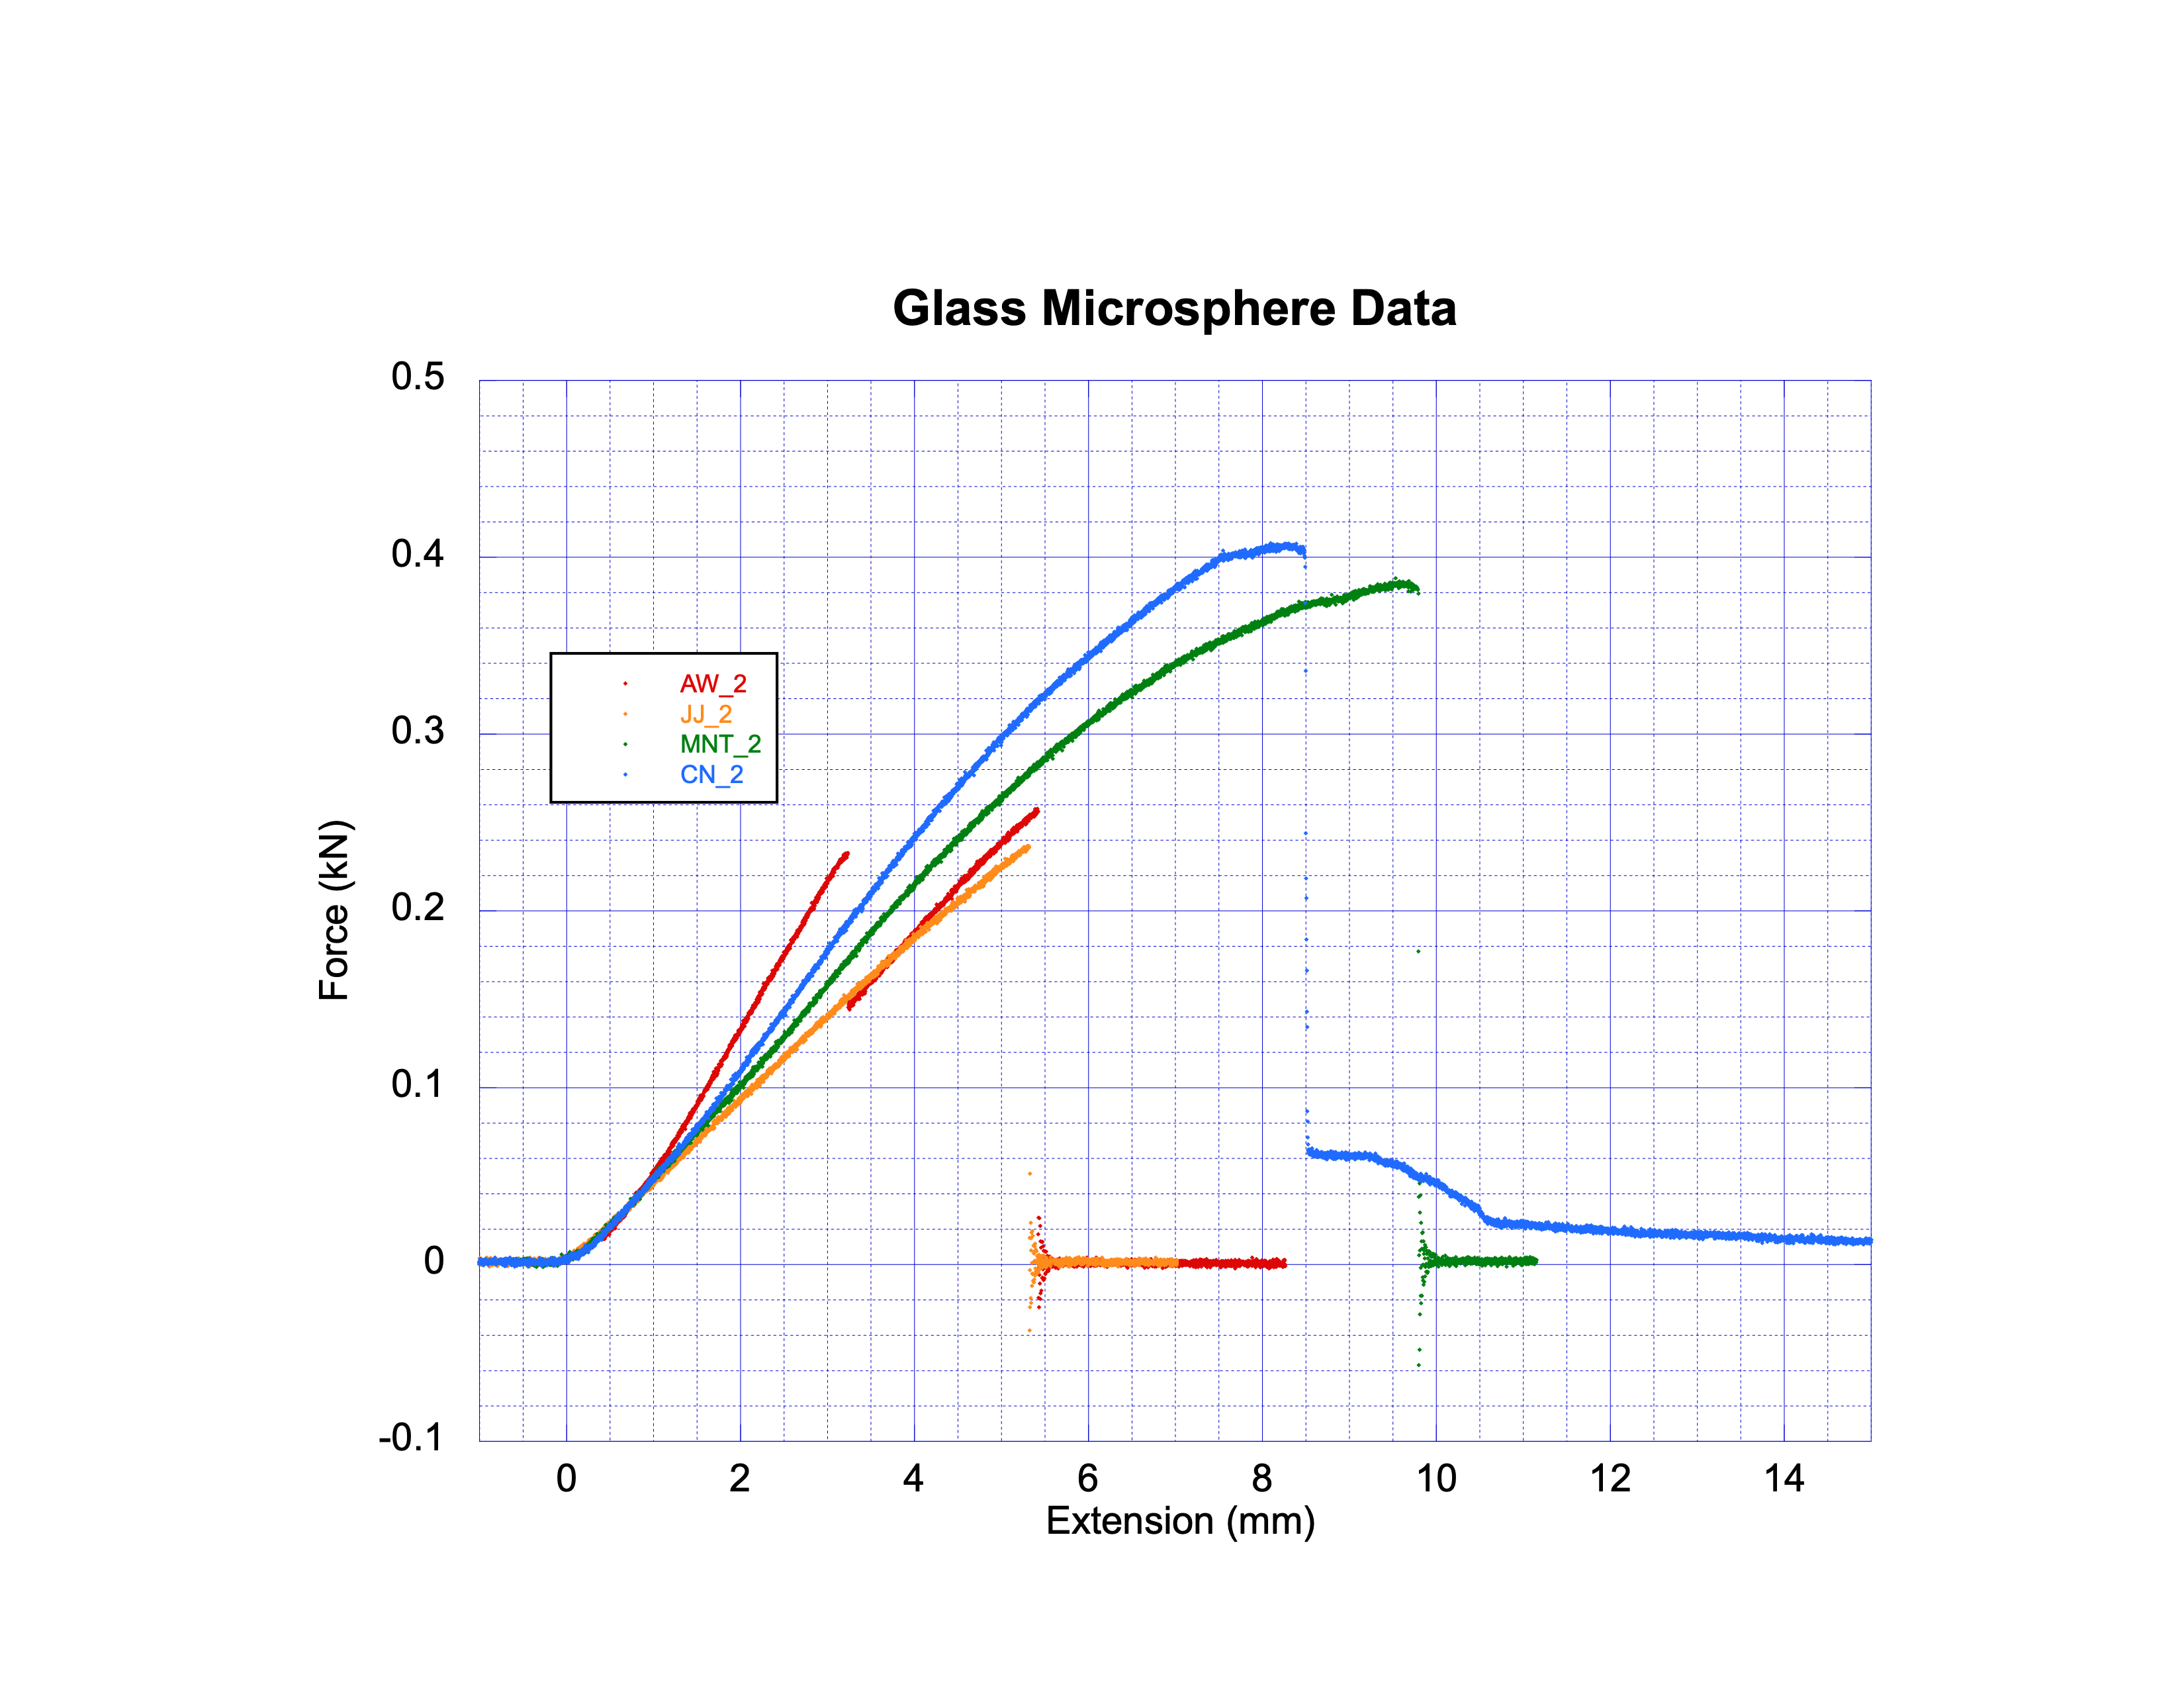 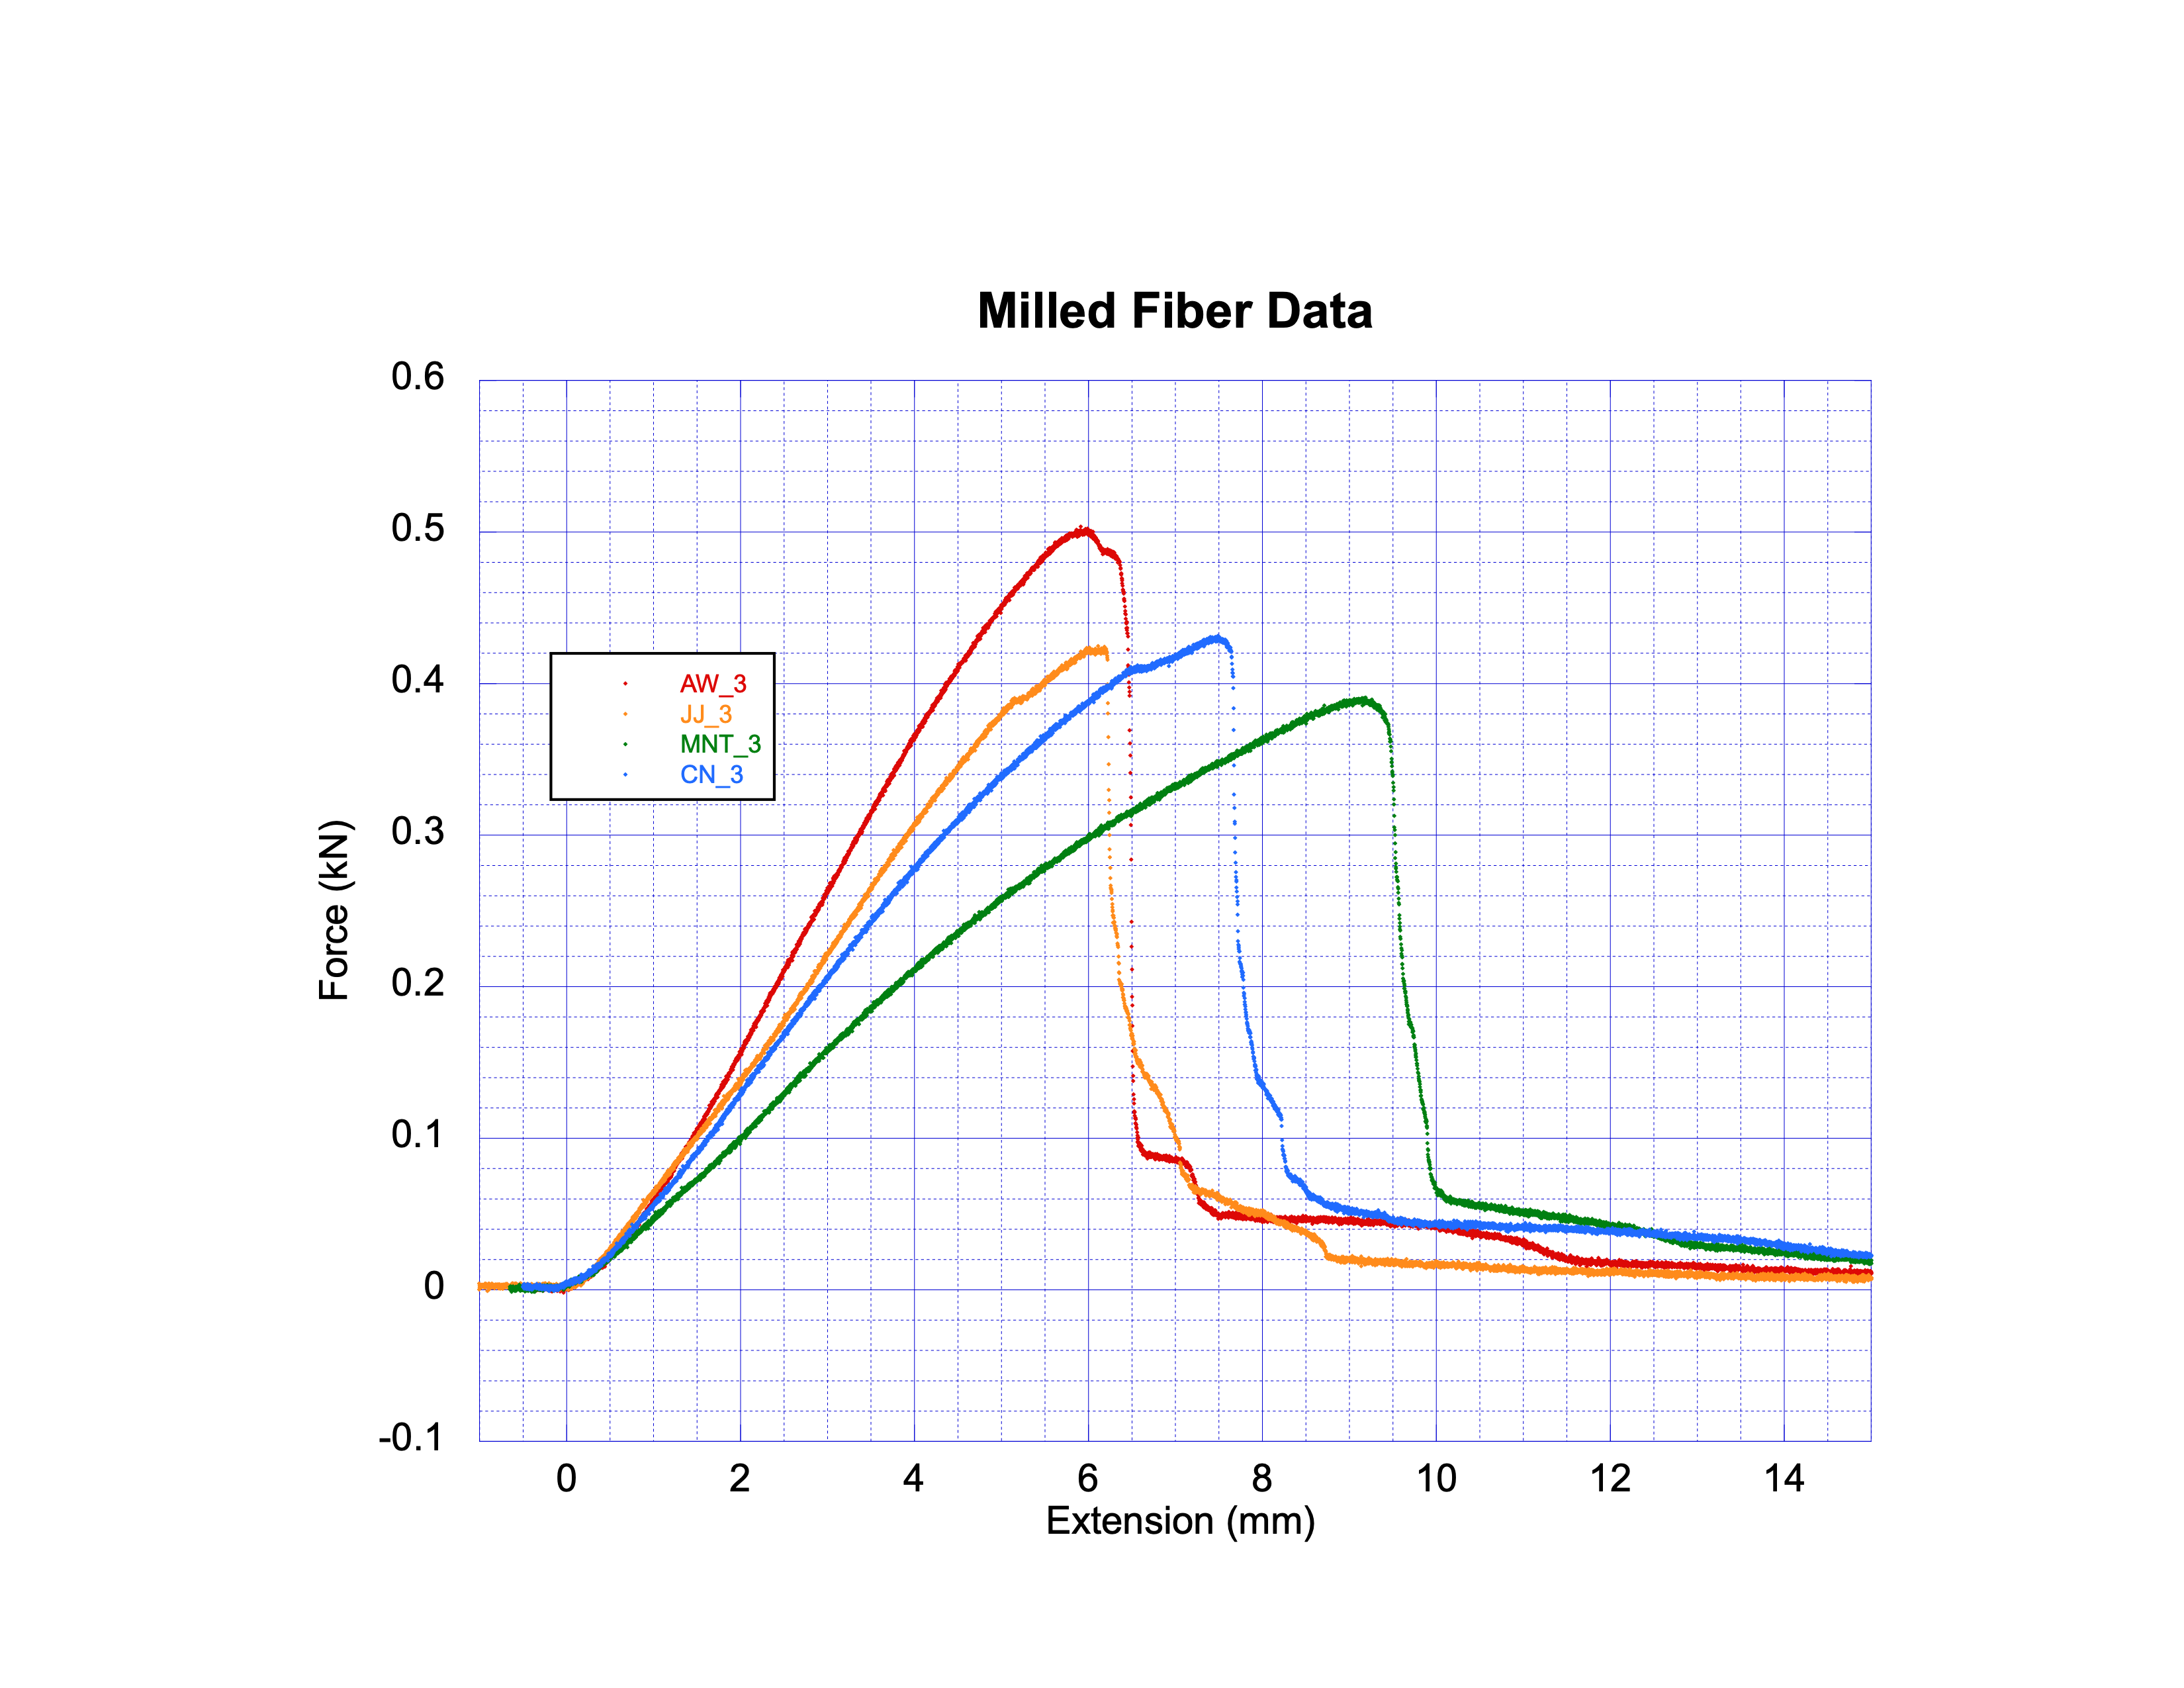
### Plotted by Team
### Raw Data, Excel, and PDF files.
[Raw Data](../FlightData/Fin_Test/20240208_All_Raw_Data.zip), [Excel](../FlightData/Fin_Test/FinTests20240208.xlsx), [PDFs of all plots](../PDF/20240208_Every_Data_Set.pdf)
## The Results of 2023's Lab 3 are found here.
For 2023 we only had one team and so there is only one set of results for the three fillet
types.
- First, the testing jig was modified this year so the force measurements cannot be
compared directly in magnitude to previous years' data.
- Second, due to operator unfamiliarity, all three samples were pre-loaded when the runs
were started. The force measurement was corrected to account for the pre-loading by
subtracting the unloaded force measurement at the end of the run from the measured
force. Then the initial slope was used to calculate at which displacement the corrected
force would have occurred, and the x-intercept subtracted from the displacement.
- Finally, during the fiber-reinforced fillet run, the fiberglass fin snapped instead
of the fillet. This is the first time that a fillet was stronger than the fin.
### Composite Plot
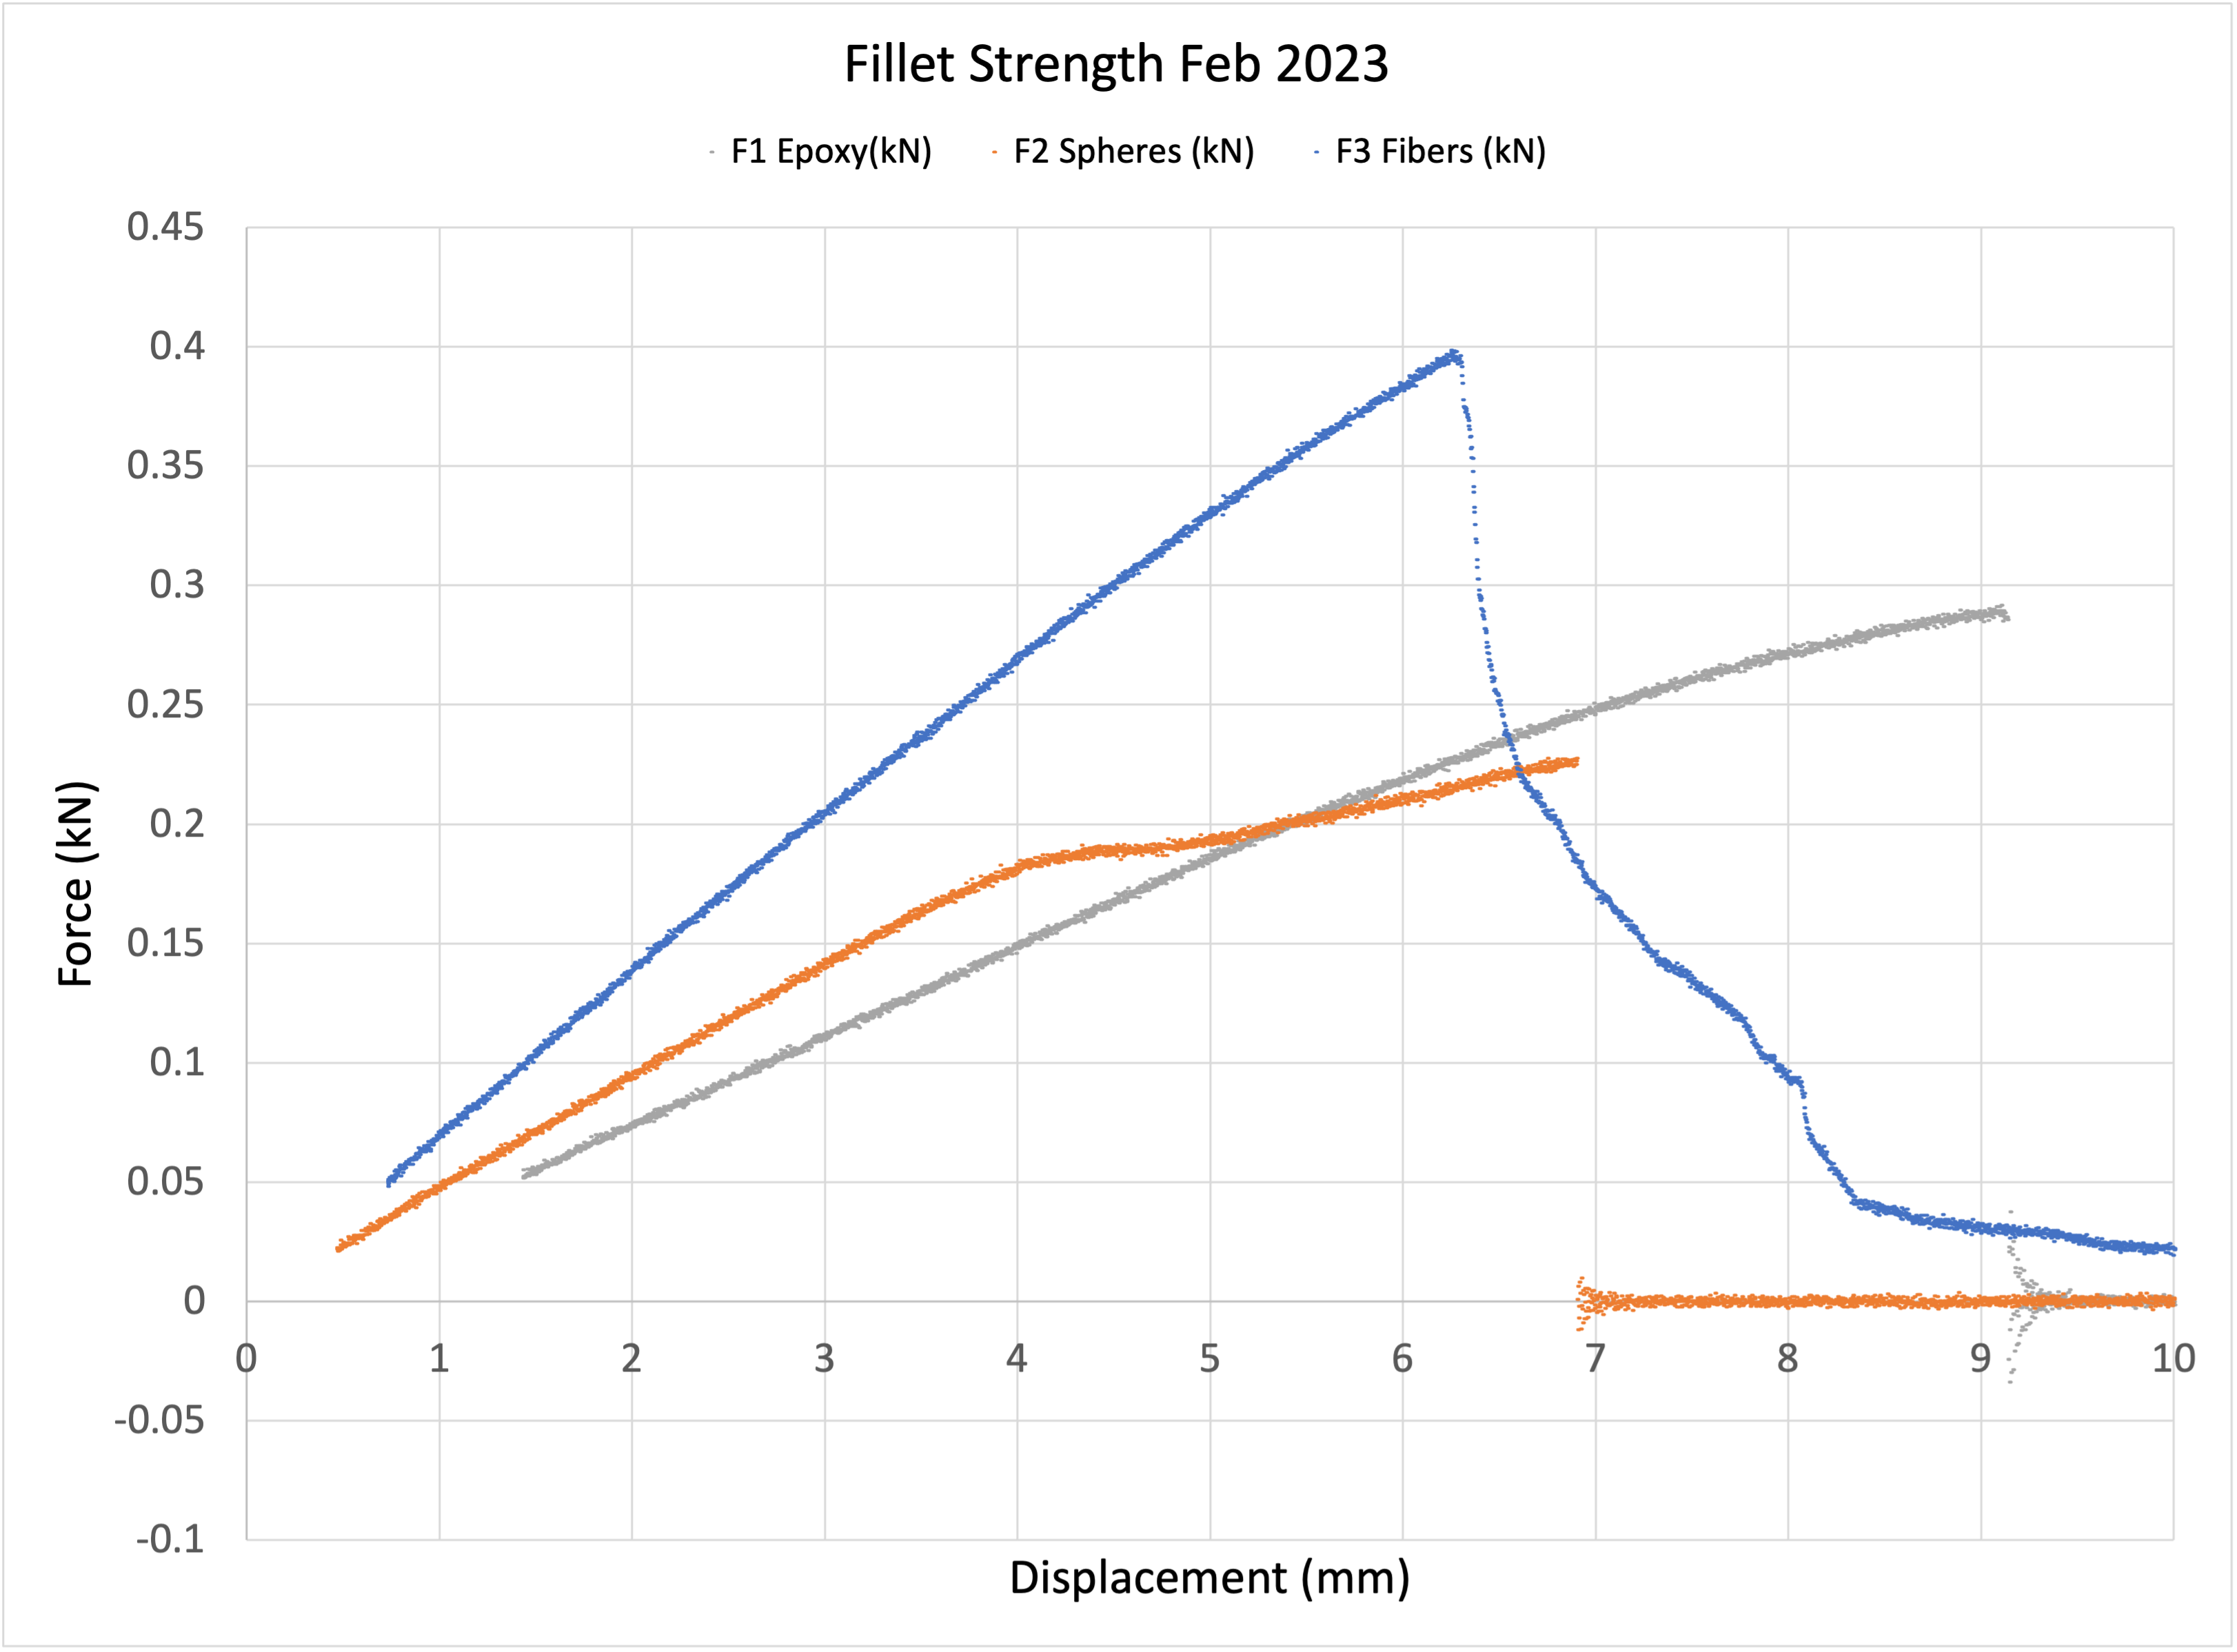
### Data file
[Excel File with Raw and Corrected Data](../ExcelModels/20230220_FinTestData.xlsx)
## The results of 2021's Lab 3 are found here.
### Plotted by Composition
  
### Plotted by Team
  
### Composite Plot

### Data Files from 2021
[Excel file of all data](../ExcelModels/20210317_CompositeData.xlsx)
## The results of 2020's Lab 3 are found here.
!!! Note
On some browsers, the previews for the figures don't display properly, but the inmage will
display properly if you click on it.
### Plotted by Composition
  
### Plotted by Team
 
### Composite Plot

### Data Files from 2020
Team | Plain Epoxy | Microspheres | Milled Fiber
:---:|-------------|--------------|-------------
JAM |[JAM_Epoxy.txt](../FlightData/Fin_Test/JAM_Epoxy.txt)|[JAM_Balloon.txt](../FlightData/Fin_Test/JAM_Balloon.txt)|[JAM_Fiber.txt](../FlightData/Fin_Test/JAM_Fiber.txt)
NN |[NN_Epoxy.txt](../FlightData/Fin_Test/NN_Epoxy.txt)|[NN_Balloon.txt](../FlightData/Fin_Test/NN_Balloon.txt)|[NN_Fiber.txt](../FlightData/Fin_Test/NN_Fiber.txt)
[Excel file of all data](../ExcelModels/FinTestData_18_FEB_2020.xlsx)
## The results of 2019's Lab 3 are found here.
### Plotted by Composition
  
### Plotted by Team
  
### Composite Plot

### Data Files from 2019
Team | Plain Epoxy | Microspheres | Milled Fiber
:---:|-------------|--------------|-------------
JM |[jm_pe.txt](../FlightData/Fin_Test/jm_pe.txt)|[jm_ms.txt](../FlightData/Fin_Test/jm_ms.txt)|[jm_mf.txt](../FlightData/Fin_Test/jm_mf.txt)
RK |[rk_pe.txt](../FlightData/Fin_Test/rk_pe.txt)|[rk_ms.txt](../FlightData/Fin_Test/rk_ms.txt)|[rk_mf.txt](../FlightData/Fin_Test/rk_mf.txt)
TM |[tm_pe.txt](../FlightData/Fin_Test/tm_pe.txt)|[tm_ms.txt](../FlightData/Fin_Test/tm_ms.txt)|[tm_mf.txt](../FlightData/Fin_Test/tm_mf.txt)
[Data from test fin](../FlightData/Fin_Test/test_fin.txt)
[Excel file of all data](../ExcelModels/FinData.xlsx)
[cra]: ../ClassRocketAssembly.md.html
[pho]: https://publicmissiles.com/secure/images/Phobosinstructionbooklet.pdf
[fil]: https://en.wikipedia.org/wiki/Fillet_(mechanics)